Guides · Setup
Set Up One Reusable Google OAuth App for Your Outloop Google Connectors
Last updated:
In short
A Google Cloud OAuth web application is the application identity Outloop uses to ask Google for approved access on your behalf.
Create one Google Cloud project, enable the Google APIs you intend to use, add the matching scopes, and create one Web application OAuth client. Save it in Outloop once as an Authentication Profile and every Google connector can reuse it — while each one still performs its own authorization and gets its own token.
What you end up with
Doing this once, in order, leaves you with a Google setup you do not have to repeat for the next connector or the next client:
- ✓One Google Cloud project dedicated to Outloop API access.
- ✓The Google APIs you intend to use, enabled.
- ✓The matching scopes configured in Google Auth Platform.
- ✓One OAuth Web application client, with the Outloop loopback redirect URI registered.
- ✓That app saved once in Outloop as an Authentication Profile.
- ✓The ability to connect further Google services without creating another OAuth client — and with no Client Secret to re-enter.
How the pieces actually fit
This is the part worth reading slowly, because almost every mistake in Google setup comes from getting this model wrong in one of two opposite directions.
One reusable OAuth application, separate connector authorizations.
The OAuth app is an application identity and configuration only. Saving it in Outloop does not create one universal Google token, and it does not merge your connectors together.
When you connect a Google service, that connector performs its own Google authorization, receives its own refresh token, requests only the scopes that connector needs, may be connected to a different Google account than another connector, and keeps its own resource boundary inside Outloop. Connecting Google Docs does not hand an agent Gmail, Google Ads or YouTube access. Revoking one connector leaves the others working.
The mapping, stated once:
Google Cloud project
  └── one or more OAuth web applications
        └── each web app has its own Client ID
              └── one Outloop Authentication Profile = one Client ID

Same Client ID      -> the same Authentication Profile
Different Client ID -> a different Authentication Profile,
even inside the same Google Cloud project Reuse is recommended convenience, not a forced architecture. One app for everything is the least work and the setup we suggest by default. A project may hold several OAuth web applications, and keeping a client-dedicated one is a legitimate choice — it is simply a second Authentication Profile.
Which setup should I choose?
There are two reasonable answers for your Google connectors, and the right one depends on who owns the Google Cloud infrastructure — not on how many clients you have.
Agency-global (shared OAuth app)
One OAuth app your agency owns, reused by every Google connector you add. This is the default and the right choice for most agencies.
- ✓Client ID and Client Secret entered once, then picked from a dropdown.
- ✓Every connector still runs its own Google sign-in.
- ✓Each one gets its own scopes, its own refresh token, its own connected account and its own revocation.
- ✓Reusing the app grants no data access by itself — workspace grants and Access Profiles stay explicit.
Workspace-dedicated
A separate OAuth client — or a separate Google Cloud project — for one workspace or one client.
- →The client owns the Google Cloud infrastructure and wants to keep owning it.
- →They need stronger administrative separation, or their own consent branding and audience rules.
- →They want separate quotas and their own lifecycle control.
- →A client's data sits inside their own Google Workspace and their IT team wants the OAuth app to live in their Google Cloud project rather than yours.
A separate Google Cloud project is the strongest operational separation. A separate OAuth client inside the same project is lighter separation — useful, but the project is still shared.
Before you start
- ✓A Google account that can create a project in Google Cloud Console. This is the account that owns the app.
- ✓The Google accounts that actually hold the data — the mailbox, the Drive, the Ads account. These are usually different accounts, and you choose them later, per connector, in the browser sign-in.
- ✓Outloop installed on your Mac.
- ✓About 20 minutes. You do this once.
Three separate identities — keep them apart
Most failed each Google service setups are one confusion: assuming the Google account that manages the Cloud project is also the account that can open data. It does not have to be, and often should not be.
- 1
The Google Cloud project and OAuth app
This owns the Client ID and Client Secret. It can belong to your agency or to your client — Outloop does not care which, and cannot tell the difference.
cloud-admin@agency.example— manages the Google Cloud project - 2
The connected Google account
This is the account you pick in Google's own chooser during the browser sign-in. It is the account that must actually own or be able to open data.
data-owner@client.example— is chosen at sign-in because it owns data - 3
Outloop workspace access
This decides which workspace may use the stored credential, which resources it may reach, and which capabilities agents get. It is set in the Access Profile, after the sign-in succeeds.
In that example, cloud-admin@agency.example
created the OAuth app once, and every connector after it reuses that app — but the account you
actually sign in as is data-owner@client.example,
because that is the identity each Google service will check when an agent asks for a file.
- →If the app's audience is External and it is still in Testing, the account must be added as a Test user first.
- →If the audience is Internal, only accounts inside that Google Workspace organisation can sign in at all.
- →The the Google API behind it must be enabled in the Google Cloud project the app belongs to.
- →The account must genuinely have access to data. A successful sign-in proves identity, not reach.
1. Create the Google Cloud project
In Google Cloud Console, create a project reserved for API access — keep it separate from any project running a website or product infrastructure. It will hold three things: the enabled APIs, the Google Auth Platform configuration, and the OAuth client.
A name like Outloop Google APIs works well. Every name in this guide
is an example you can change; nothing in Outloop depends on it.
2. Enable the APIs you intend to use
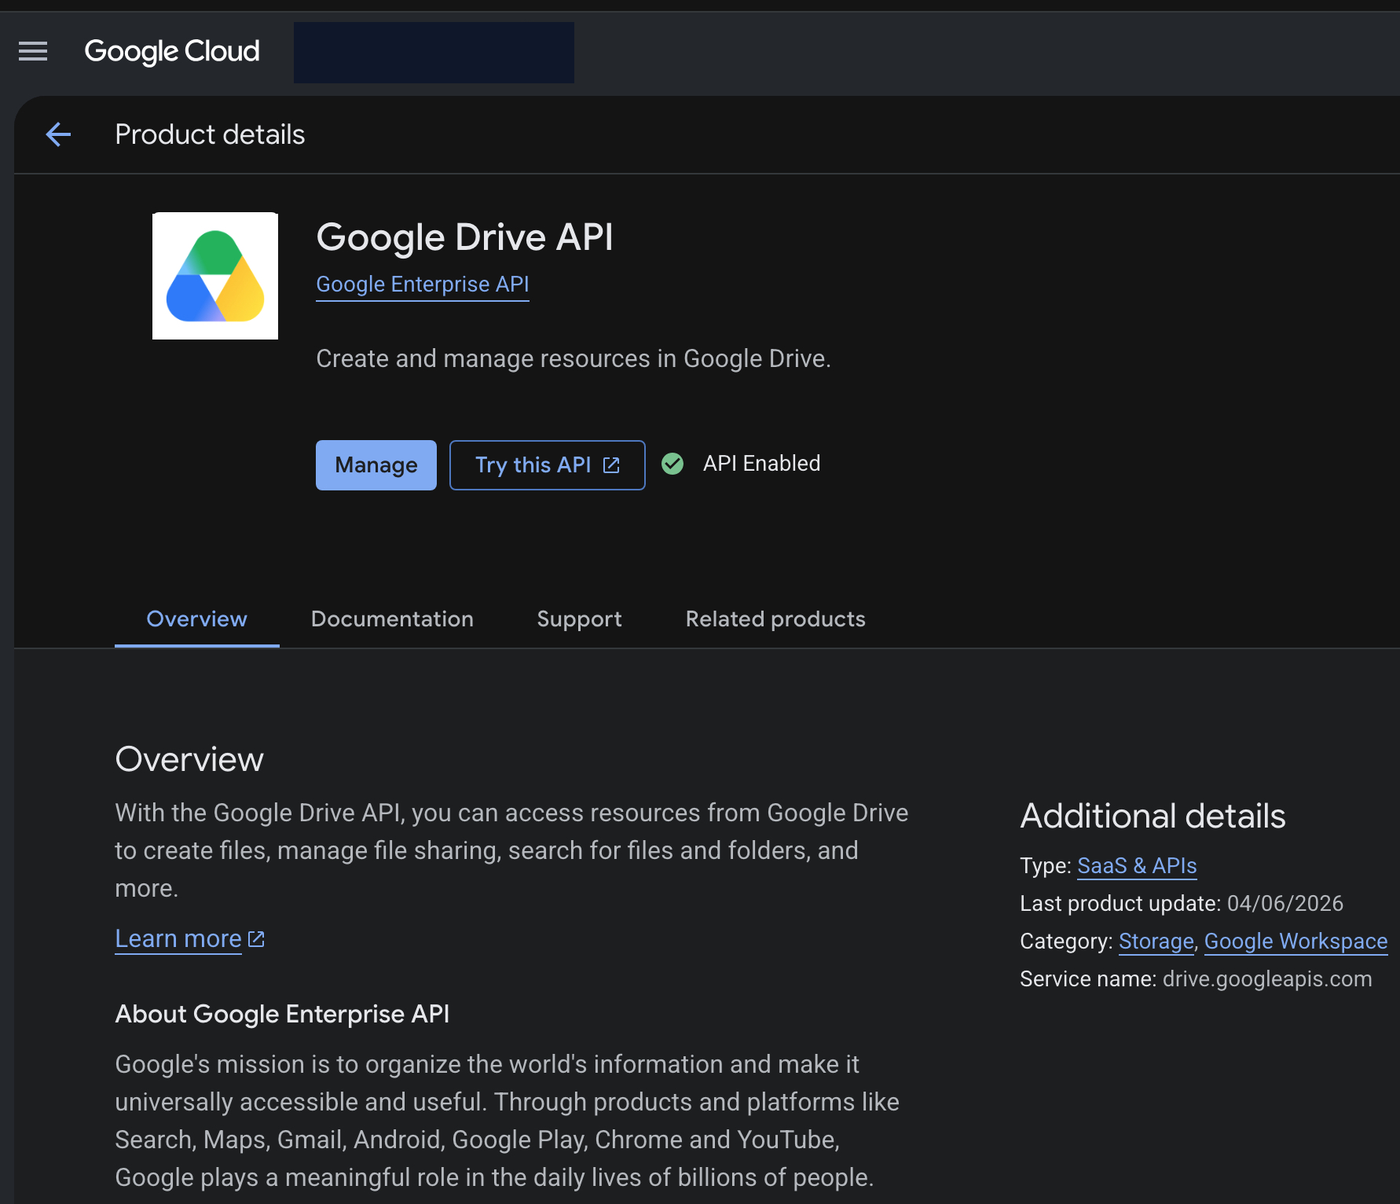
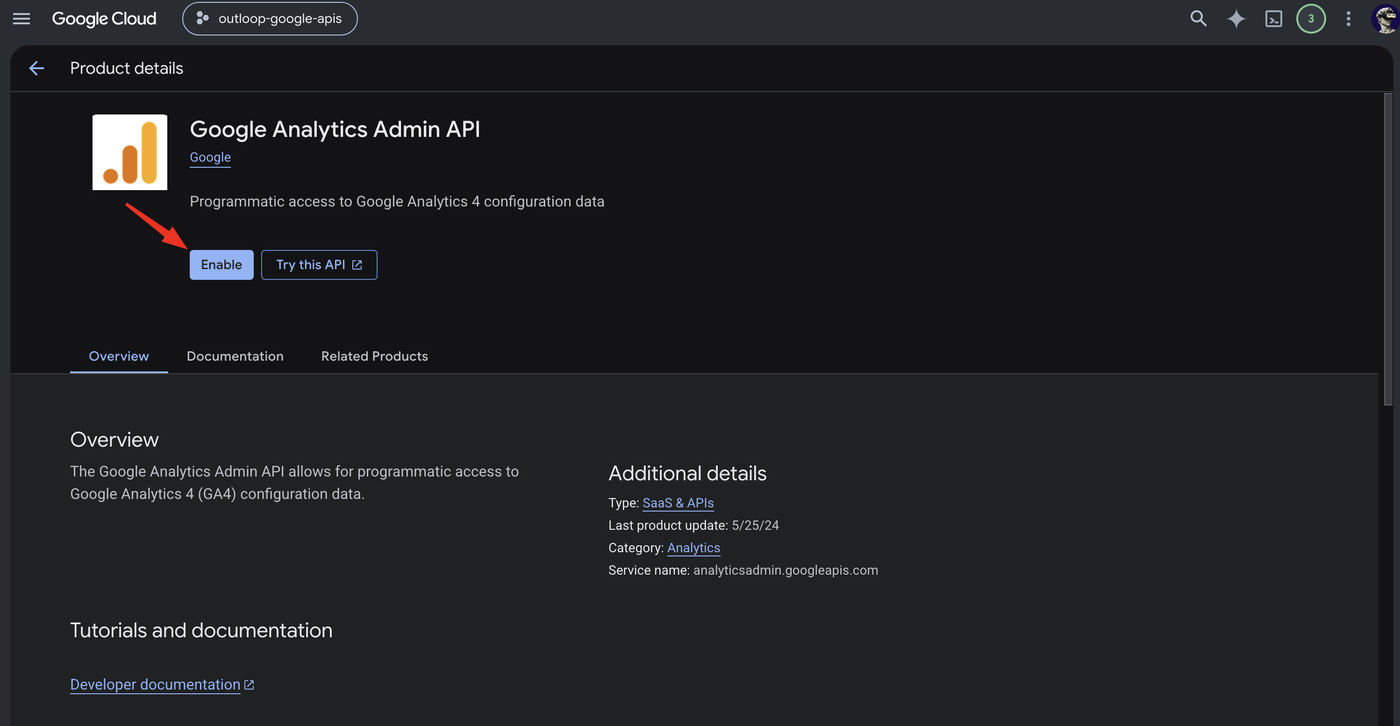
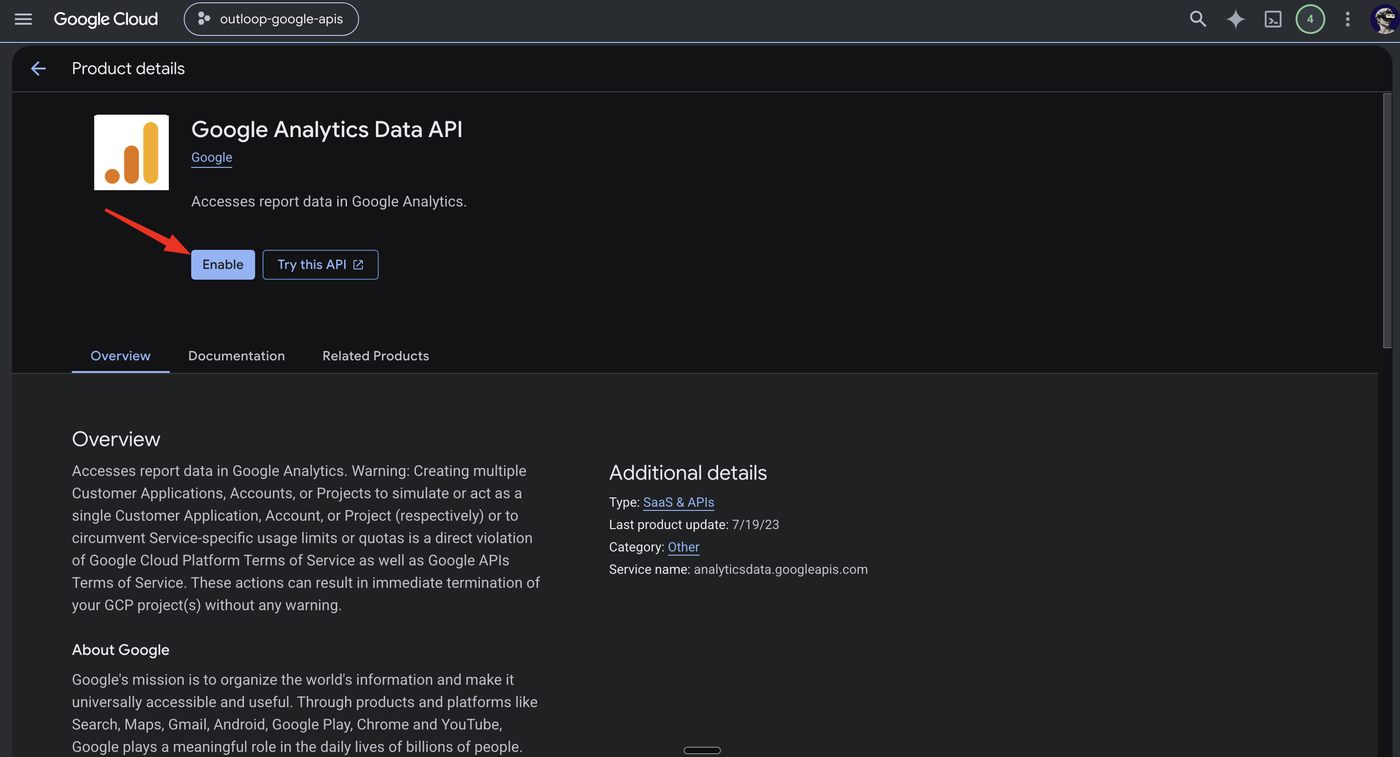
In APIs & Services → Library, search for each API and click Enable.
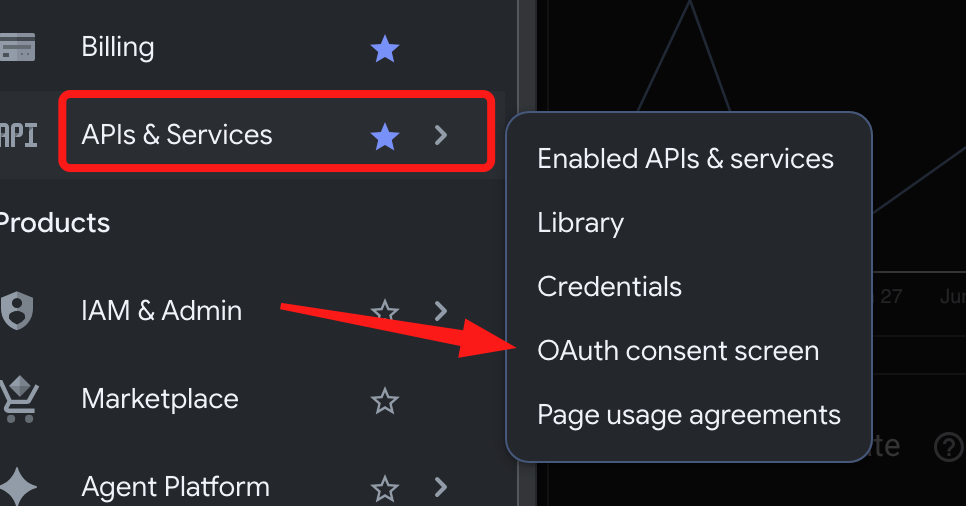
Enable one row per Google service you plan to connect:
| Outloop connector | API to enable | Setup guide |
|---|---|---|
| Gmail | Gmail API | Guide |
| Google Drive | Google Drive API | Guide |
| Google Docs | Google Docs API | Guide |
| Google Sheets | Google Sheets API | Guide |
| Google Slides | Google Slides API | Guide |
| Google Calendar | Google Calendar API | No guide yet |
| Google Ads | Google Ads API + Google Data Manager API (offline conversions) | Guide |
| Google Analytics GA4 | Google Analytics Admin API + Google Analytics Data API | Guide |
| Google Search Console | Google Search Console API | Guide |
| Google Tag Manager | Tag Manager API | Guide |
| Google Merchant Center | Merchant API | Guide |
| YouTube (private channel) | YouTube Data API v3 | Guide |
3. Add the scopes (one paste)
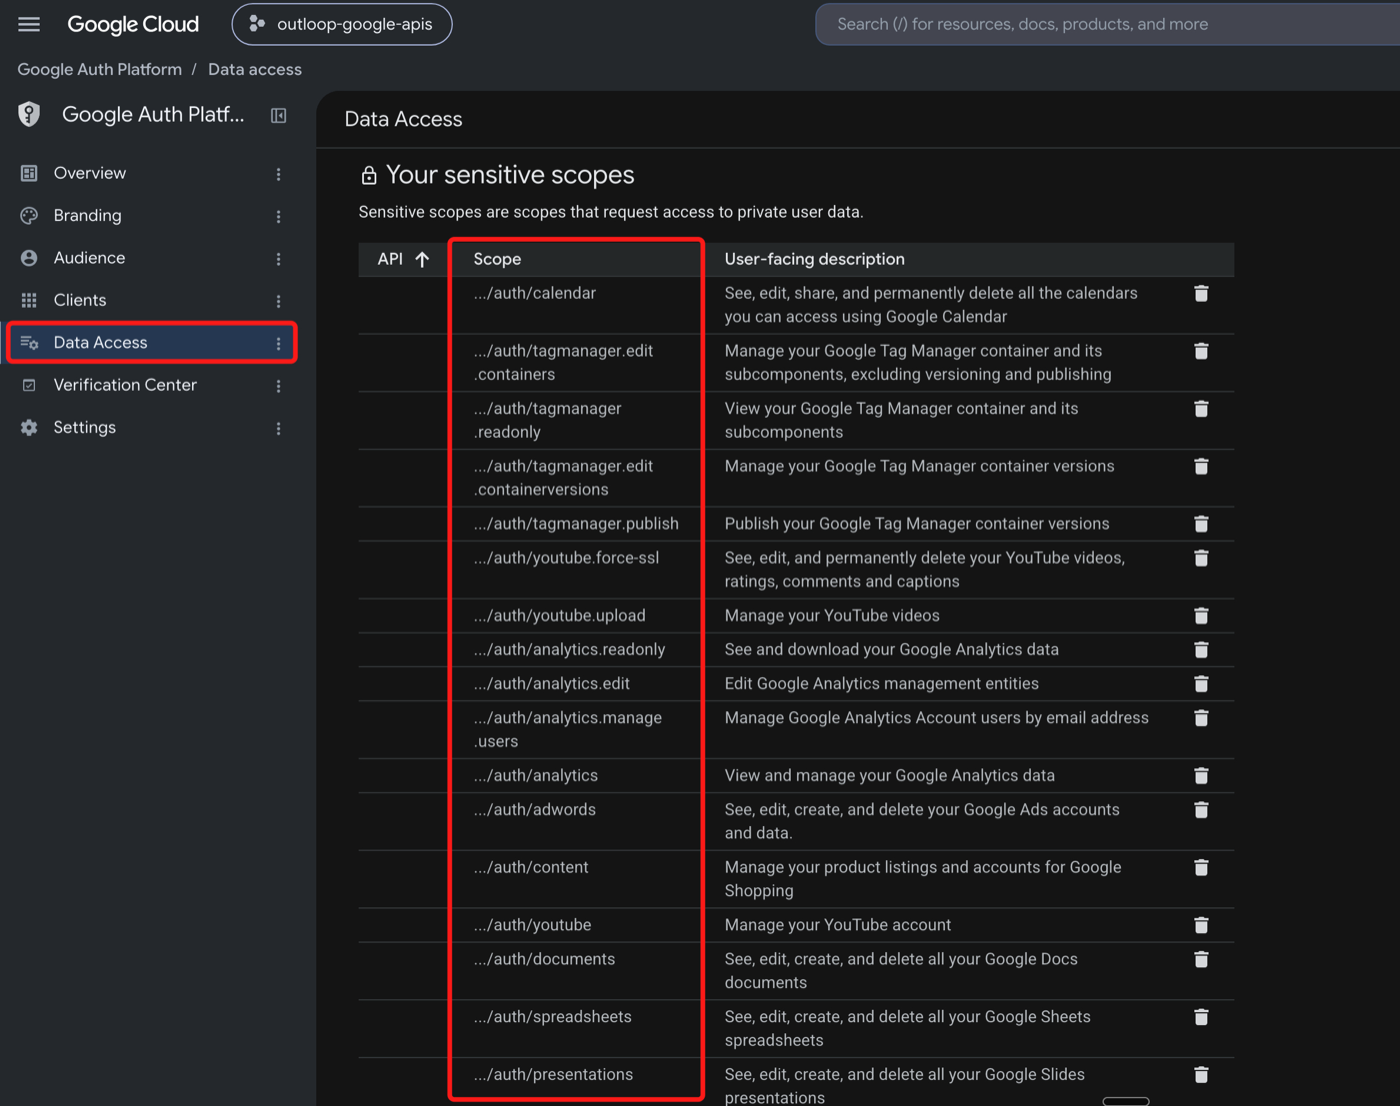
In Google Auth Platform → Data access, click Add or remove scopes.
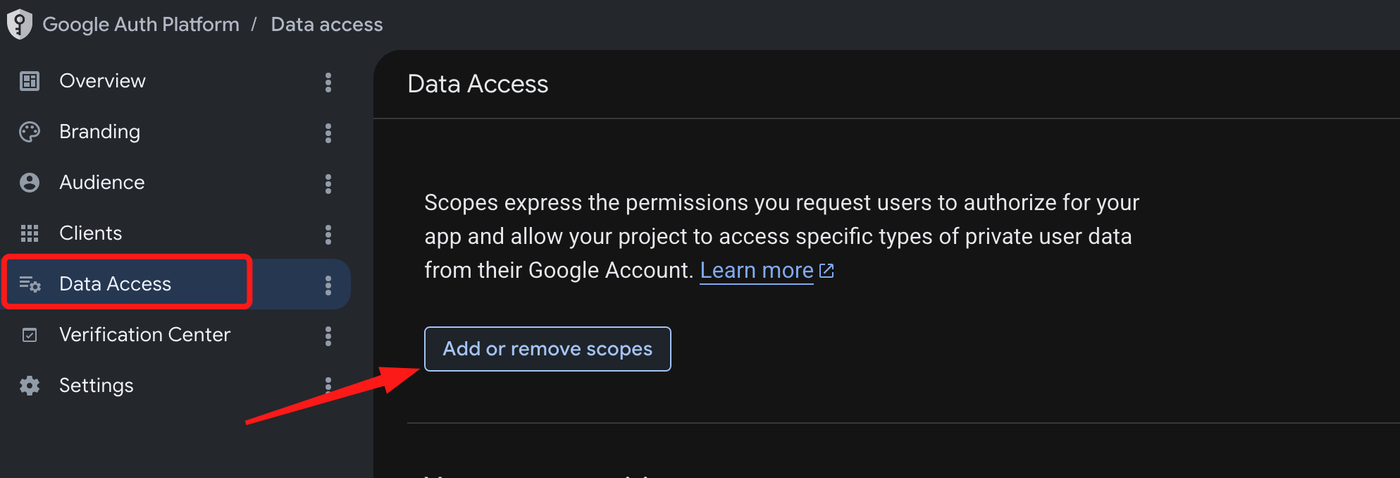
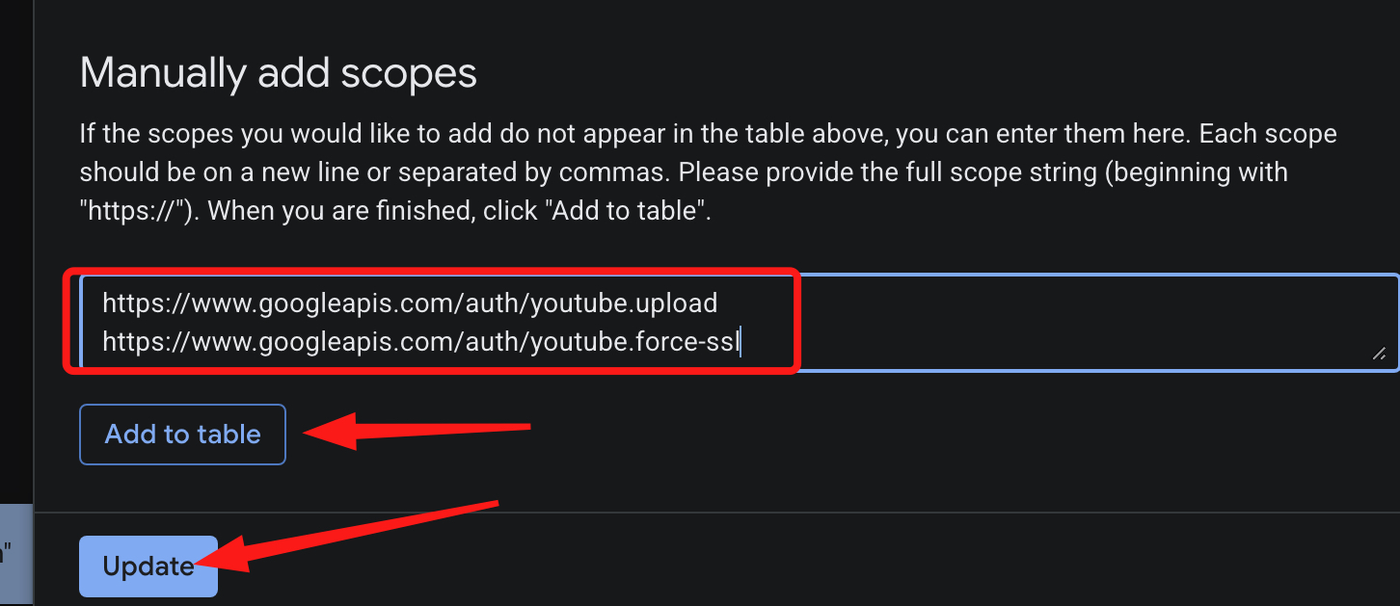
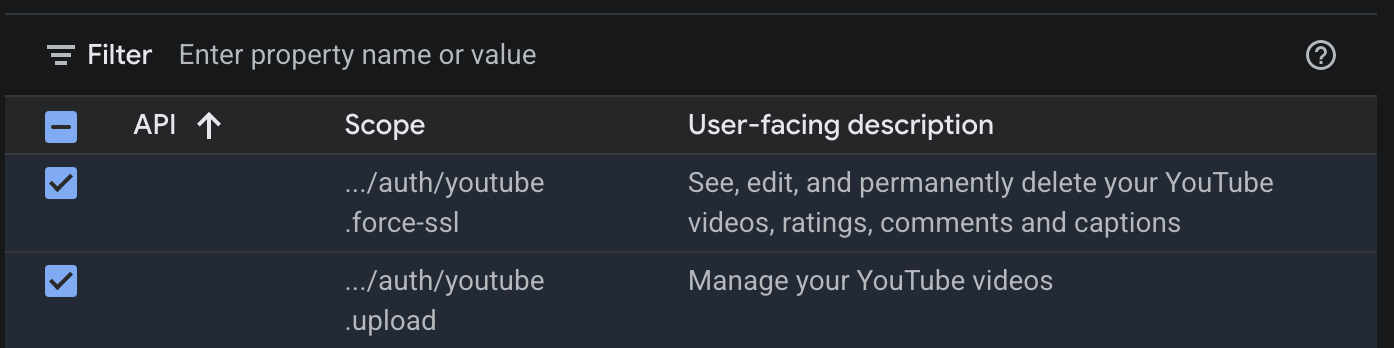
Scroll the panel to Manually add scopes and paste the block below in one go — Google accepts one scope per line. Then click Add to table, tick the rows, and click Update.
This is the recommended scope set for one reusable app that can serve every Google service Outloop supports today. It is a starting point, not an obligation — if you only intend to connect two services, use the per-service blocks underneath instead.
https://www.googleapis.com/auth/gmail.readonly
https://www.googleapis.com/auth/gmail.compose
https://www.googleapis.com/auth/gmail.modify
https://www.googleapis.com/auth/gmail.send
https://www.googleapis.com/auth/drive.file
https://www.googleapis.com/auth/documents
https://www.googleapis.com/auth/spreadsheets
https://www.googleapis.com/auth/presentations
https://www.googleapis.com/auth/calendar.events
https://www.googleapis.com/auth/calendar.calendarlist.readonly
https://www.googleapis.com/auth/adwords
https://www.googleapis.com/auth/datamanager
https://www.googleapis.com/auth/analytics.readonly
https://www.googleapis.com/auth/analytics.edit
https://www.googleapis.com/auth/analytics.manage.users
https://www.googleapis.com/auth/webmasters
https://www.googleapis.com/auth/youtube
https://www.googleapis.com/auth/youtube.upload
https://www.googleapis.com/auth/youtube.force-ssl
https://www.googleapis.com/auth/content
https://www.googleapis.com/auth/tagmanager.edit.containers
https://www.googleapis.com/auth/tagmanager.edit.containerversions
https://www.googleapis.com/auth/tagmanager.publish
openid and userinfo.email separately. Google's
Manually add scopes box asks for the full scope string beginning with
https://, so the identity pair does not belong in the paste above. Tick
openid and
https://www.googleapis.com/auth/userinfo.email in the
non-sensitive scopes table in the same panel. Outloop uses them only to confirm
which Google account you connected — that check is Google OIDC and it reads none of
your data.
Only setting up some services? Copy just those scopes
Each block is the recommended tier for that connector. Several connectors also offer narrower or broader tiers — read-only variants, or full Drive instead of app-files — and the connector's own guide covers those.
Gmail
https://www.googleapis.com/auth/gmail.readonly
https://www.googleapis.com/auth/gmail.compose
https://www.googleapis.com/auth/gmail.modify
https://www.googleapis.com/auth/gmail.send
Google Drive
https://www.googleapis.com/auth/drive.file
Google Docs
https://www.googleapis.com/auth/documents
Google Sheets
https://www.googleapis.com/auth/spreadsheets
Google Slides
https://www.googleapis.com/auth/presentations
Google Calendar
https://www.googleapis.com/auth/calendar.events
https://www.googleapis.com/auth/calendar.calendarlist.readonly
Google Ads
https://www.googleapis.com/auth/adwords
https://www.googleapis.com/auth/datamanager
Google Analytics GA4
https://www.googleapis.com/auth/analytics.readonly
https://www.googleapis.com/auth/analytics.edit
https://www.googleapis.com/auth/analytics.manage.users
Google Search Console
https://www.googleapis.com/auth/webmasters
Google Tag Manager
https://www.googleapis.com/auth/tagmanager.edit.containers
https://www.googleapis.com/auth/tagmanager.edit.containerversions
https://www.googleapis.com/auth/tagmanager.publish
Google Merchant Center
https://www.googleapis.com/auth/content
YouTube (private channel)
https://www.googleapis.com/auth/youtube
https://www.googleapis.com/auth/youtube.upload
https://www.googleapis.com/auth/youtube.force-ssl
tagmanager.manage.accounts,
tagmanager.manage.users or
tagmanager.delete.containers, and no shipped access tier requests
them. Account administration is refused inside Outloop regardless. More generally: do not add
Google scopes “just in case” — every extra scope widens the consent screen your clients see and
buys you nothing.
drive.file, which limits the agent to files it created or opened
through that credential, and Google itself enforces that boundary. Those guides are not out of
date; they are asking for the narrower thing on purpose.
4. Create the OAuth web application
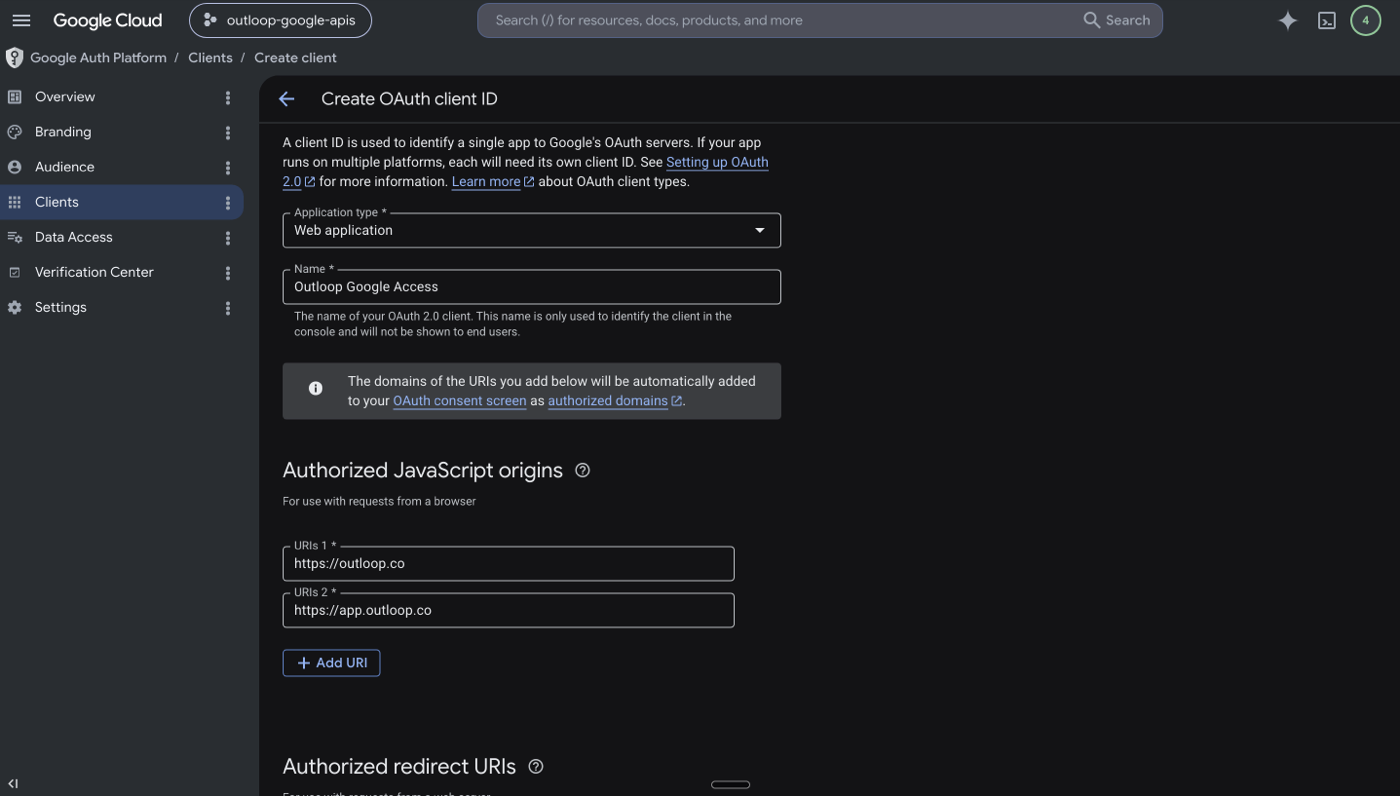
In Google Auth Platform → Clients, create a new OAuth
client. Choose application type Web application and give
it one neutral name — Outloop Main OAuth App — rather than a
per-connector name. One app serves them all, so naming it after a single service will only
confuse you in a month.
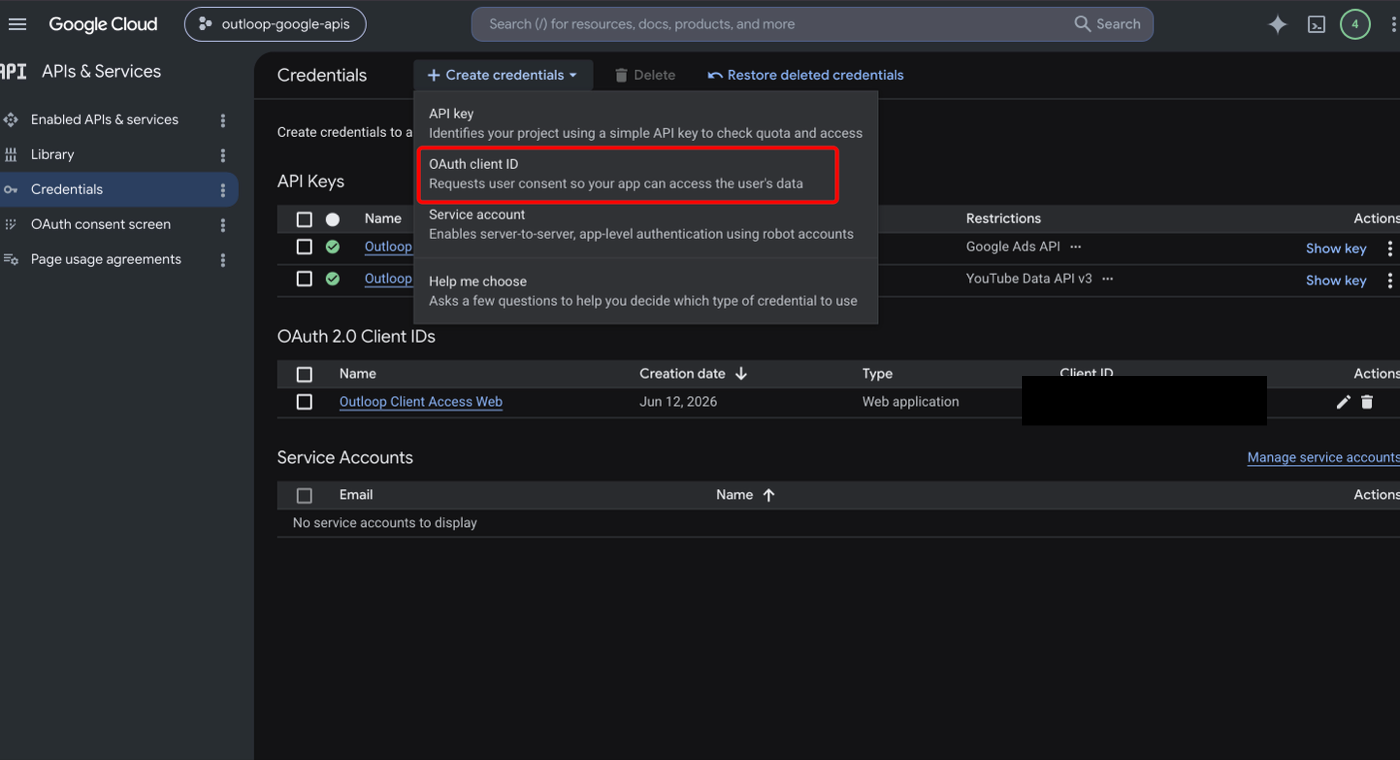
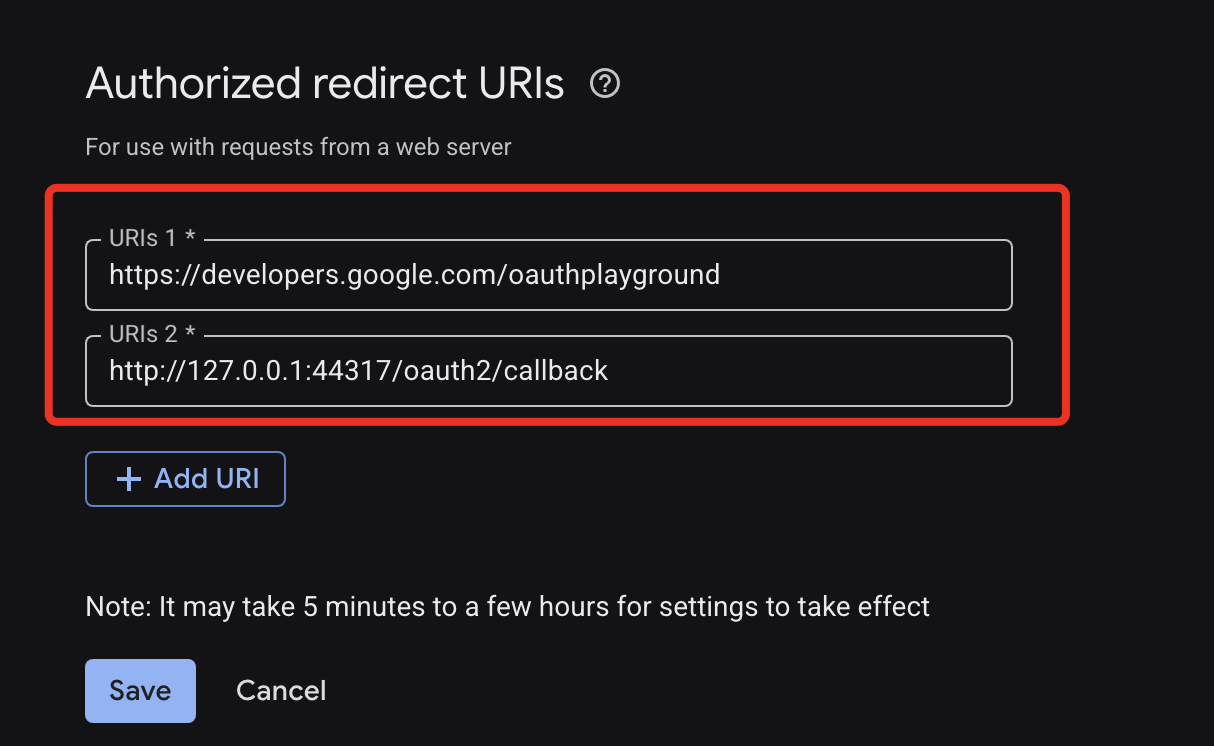
Under Authorized redirect URIs, click ADD URI and add exactly this:
http://127.0.0.1:44317/oauth2/callback
That is a loopback address on your own Mac. Google returns the authorization code there and Outloop completes the exchange locally, which is why the normal flow has no refresh token for you to copy and nothing sensitive passes through a third-party website. Leave Authorized JavaScript origins empty.
redirect_uri_mismatch on the Google sign-in screen. Changes can take a few
minutes to take effect at Google.
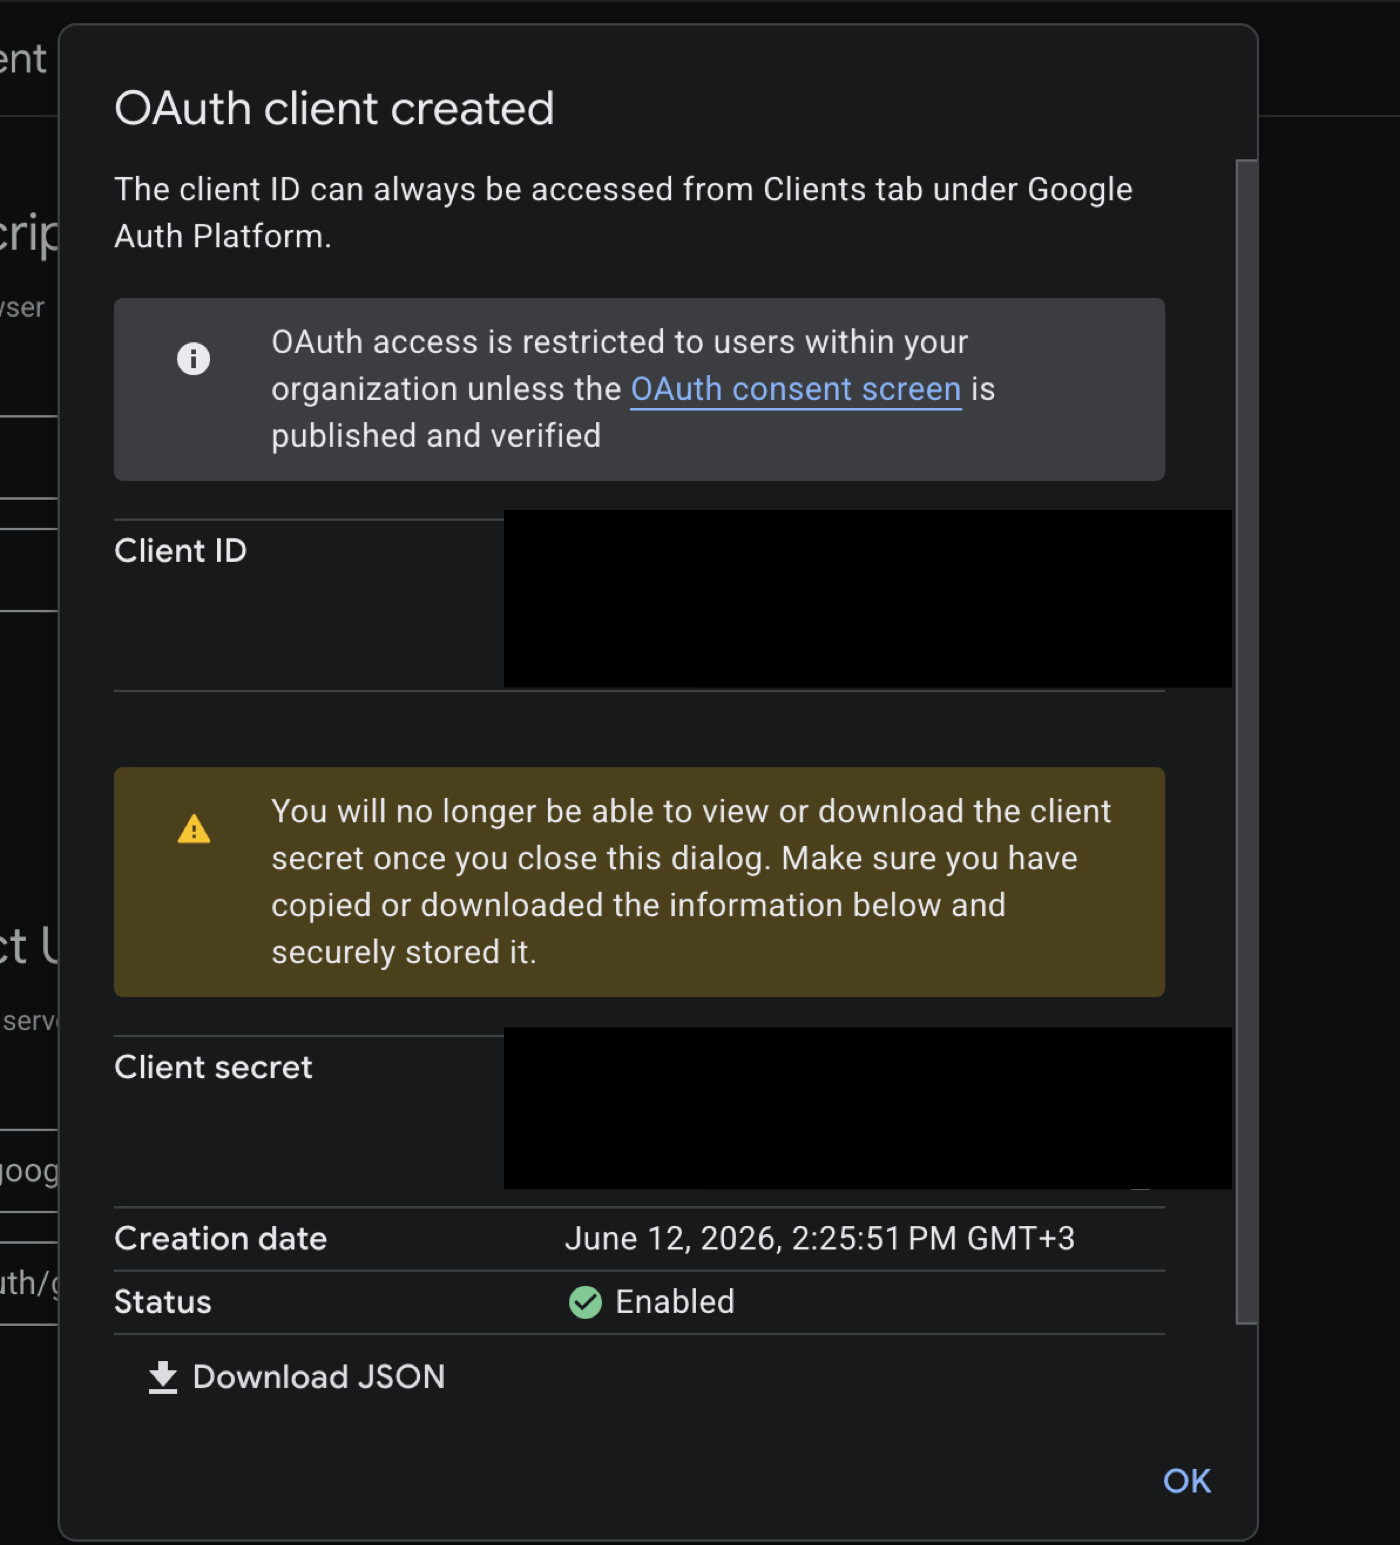
Click Create. Google shows the Client ID and Client Secret. Copy both now — Google may show the secret only once, and if you lose it you create a new one.
5. Set the publishing status
Still in Google Auth Platform, check the app's publishing status. This step takes ten seconds and skipping it is why a working setup mysteriously dies a week later.
Two scope families also need Google's own verification before production use with accounts outside your organization. Outloop marks them clearly, and it is worth knowing which is which before you pick a tier:
- →Gmail — the
gmail.*scopes are restricted. A production consent screen needs Google verification, including a CASA security assessment. - →Drive —
driveanddrive.readonlyare restricted. The recommendeddrive.filetier is not, which is a genuine reason to prefer it.
Restricted scopes and sensitive scopes are different categories and appear in different tables in Google Auth Platform, so do not be surprised when a scope you added is not in the list you were looking at.
6. Save it once in Outloop
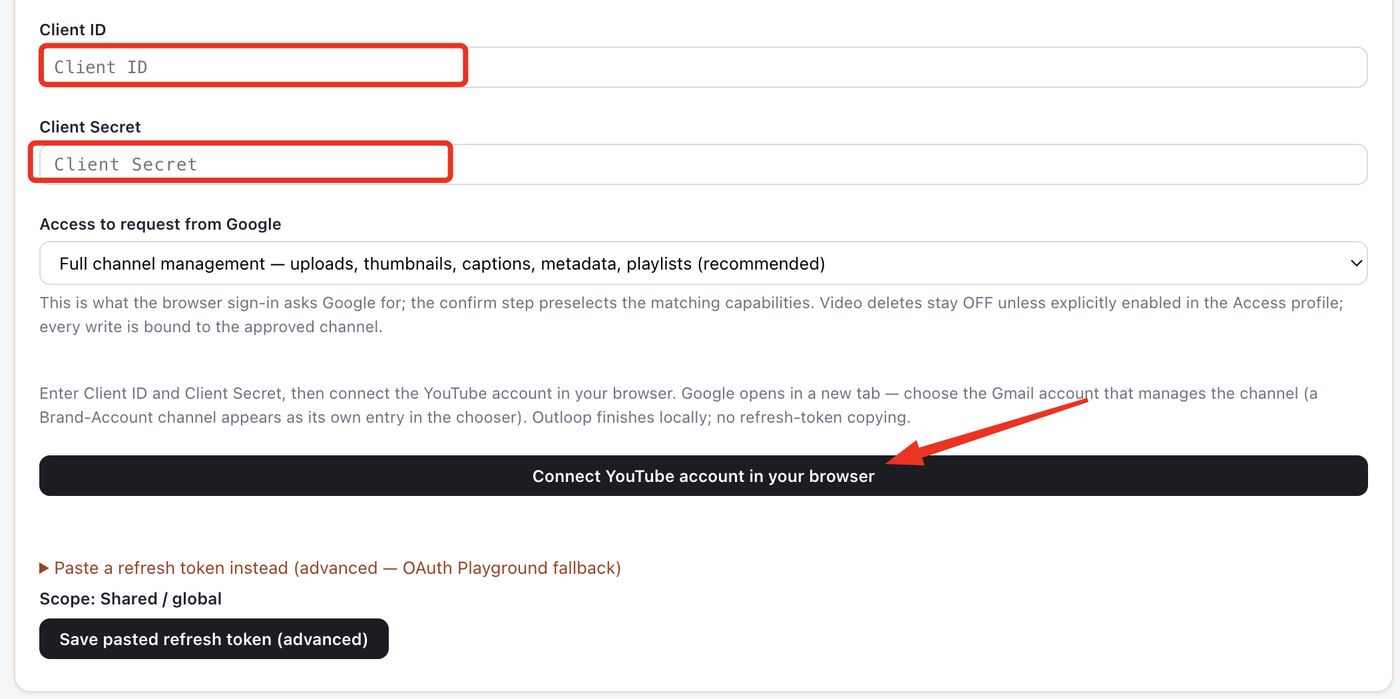
Open Outloop and go to API Keys & Access → Add an API key. Choose any Google service you want to set up first — the app is saved as a by-product of your first Google connector, so there is no separate “create the profile” step to find.
Paste the Client ID and Client Secret, then tick:
Save this Google OAuth app so other Google connectors can reuse it
Outloop's own note under that checkbox says it plainly: “Only the app's Client ID and Client Secret are saved — never a token. Each connector still signs in separately and gets its own access.”
The saved app is then listed on the Authentication Profiles
page — Outloop's home for reusable authentication configurations and credential maintenance. A
name like Outloop Main Google OAuth makes it obvious later.
7. Connect each Google service
From here on the loop is short. For every further Google connector:
- Open API Keys & Access → Add an API key and choose the service.
- Pick your saved app from the Google OAuth app dropdown — Choose a Google OAuth app…
- Choose the access tier for that connector.
- Click connect and sign in to Google in your browser, choosing the account that owns that data.
- Confirm the connected account, then set the connector's Access Profile — the resources that workspace may reach.
- Run the connector's safe first read.
With a saved app selected, Outloop tells you there is nothing to paste: “Using <client-id>. Its Client Secret comes from the saved app — nothing to paste. This connector still signs in separately and gets its own access.” No second OAuth client, no second Client Secret, and no refresh token to copy.

secret_exposed: false.Setup checklist
- ✓Google Cloud project created
- ✓Google APIs enabled for the services you will connect
- ✓Scopes configured in Data access, plus
openidanduserinfo.email - ✓OAuth Web application created
- ✓Redirect URI
http://127.0.0.1:44317/oauth2/callbackregistered - ✓Publishing status set to In production
- ✓Authentication Profile saved in Outloop
- ✓First Google connector connected and its Access Profile saved
Keeping the Client Secret safe
- ✕Never paste a Client Secret into a chat, a prompt, a project file, a
.env, or a repository. An agent does not need it and must never be given it. - ✓Enter it only in the Outloop setup panel on your own Mac.
- ✓Outloop stores it in the macOS Keychain and reads it host-side at request time. The credential is used on the wire; the agent uses its capability without ever seeing it.
- ✕Never publish a screenshot showing a Client Secret, a refresh or access token, or an
Authorizationheader. Redact before you capture, not after. - ✓To rotate, create a new secret in Google Cloud and update the Authentication Profile. Connectors created from a saved profile stay covered by that rotation; ones where the values were typed in directly keep their own copy and must be updated individually.
When something goes wrong
Setup errors specific to the OAuth app
- →
redirect_uri_mismatchon the Google sign-in screen. The client is missinghttp://127.0.0.1:44317/oauth2/callback, has it under JavaScript origins instead of redirect URIs, or is a Desktop app rather than a Web application. Fix it on the client and wait a few minutes. - →The connection worked, then stopped after about a week. The app is still in Testing. Set it to In production (step 5) and reconnect the connector.
- →The scope you need is not in the list. Its API is not enabled yet. Enable it in the Library (step 2), then reopen Data access.
- →Sign-in succeeds but calls fail at Google. The scope is present but the API is off. They are two separate switches — check both.
- →Google warns the app is unverified. Expected for an app you own that has not been through verification. Confirm it is your own app, then continue via the advanced option — and see step 5 on which scopes need Google's verification for production use.
Google shows an account chooser
Expected. Outloop asks Google for the chooser on purpose, so a sign-in can never silently reuse whichever account your browser happened to be logged into. Pick the account that owns or can open data — which is often not the account that manages the Google Cloud project.
“Google hasn’t verified this app”
This appears because the OAuth app is your own and has not been through Google's verification. If it is your app and you trust it, expand Advanced and continue. If you do not know who owns the app, stop — that warning is doing its job, and clicking past an unknown app is not a routine step.
Which audience the app uses decides who can get that far at all. An External app in Testing only admits accounts added as Test users. An Internal app only admits accounts inside its Google Workspace organisation. For customer-facing production use, complete Google's verification rather than living in Testing.
The wrong Google account got connected
Use Connect as a different Google account on the connector. It keeps the same Client ID and Client Secret and reopens Google's chooser. The stored token is only replaced once Outloop verifies the new identity is the intended one — if it does not match, Outloop reports the mismatch and keeps the previous credential. Nothing is lost by trying.
A credential that works but sits on the wrong account is deliberately not marked runtime-verified for that workspace. Working and correct are different things.
BACKEND_AUTH_FAILED during connect
Google rejected the sign-in, so the new credential failed Outloop's safe verification. The important part: the previous credential is unchanged. Do not delete the connector, the OAuth app or the workspace as a first move. Check, in this order — that you signed in as the account that can reach data; that the account is admitted by the app's audience (a Test user on an External+Testing app); and that the API is enabled in the right Cloud project. Then try the connect again.
Reconnecting never asked for the Client ID and Secret
Expected. Disconnecting a a Google connector credential does not delete your saved Google OAuth app profile — that is a separate object, kept on purpose so later connectors do not re-enter a Client Secret. Outloop reused it. If you specifically want a different app, pick another saved profile from the Google OAuth app dropdown, or create a new one and save it alongside. This is reuse working, not a stale credential silently retained.
“Copy workspace run prompt” is not available
The Access Profile has not been saved yet. Open the Access Profile, choose the reach and the capabilities, and click Save Access Profile — the run prompt becomes available once the authorization is recorded. OAuth succeeding is not the same as the workspace being authorized, and this is the step that closes the gap.
The connection stops working after about a week
If the OAuth app's audience is External and its publishing status is still Testing, Google expires refresh tokens for that app after roughly seven days. Two honest options: publish the app to In production, or use an Internal audience if everyone signing in is inside your Google Workspace organisation. Publishing may require Google's verification review depending on the scopes the app requests — that is Google's process and its outcome and timing are not ours to promise.
Official Google documentation
- →Using OAuth 2.0 to access Google APIs — refresh-token behaviour, including the Testing-status expiry.
- →OAuth app audience and publishing status — Internal vs External, Testing, and test users.
- →OAuth 2.0 scopes for Google APIs — the authoritative scope list per API.
- →Set up your OAuth consent screen — Google's own walkthrough of the Auth Platform pages.
- →Third-party apps with account access — where a connected Google account revokes access.
Outloop is an independent tool and is not affiliated with or endorsed by Google. Next, pick the service you want to connect first from the full guide index, read the security model, or see how this works across client marketing accounts.
Configure Google once. Reuse it across your Outloop Google connectors.
Outloop is available with setup guides and product support for AI agencies, operators, and dev shops.