Guides · Setup guides
Connect almost any API to your AI worker
Install the Custom API Skill, tell your agent which service you need, paste the credential once into Outloop, and let the agent finish and verify the connection.
Outloop Custom API Setup v1.1.1 · ZIP · for Claude, Claude Code and Codex
Last updated:
Watch: Connect an API with your AI agent
See the complete workflow — from installing the Skill to a verified API connection.
The complete tutorial
1:15 · Open video full size
Read the transcript
If you want your AI agent to use an API, here's the quickest safe way to set it up in Outloop. First, check for a dedicated connector. If Outloop already has the right one, use it. If not, use Custom API. Download the Custom API Skill — it's right here in Outloop, or on this page — and add it to Claude, Claude Code or Codex. Then tell your agent which service you need. It asks, and I just say: Higgsfield. The agent reads the provider's documentation and prepares the connection in Outloop for me. When it needs a key, it offers to open Higgsfield's API page. I create the key myself, and I paste it straight into Outloop — once. It never goes into the chat, and the agent never sees it. Then the agent finishes the setup, Outloop verifies the connection with a real request, and the agent runs a first real task. And again — if a dedicated connector exists, use that instead. The four steps are right below this video. Follow them to connect your next API.
Quick start
Four steps. You paste the key once.
Tell Outloop which service you want. The agent prepares everything. You create and paste the API key once. The agent finishes the integration and verifies it. The agent never sees the secret.
-
Install the Custom API Skill
Download it here and add it to Claude, Claude Code or Codex. One time.
You
-
Tell your agent which service
For example: “Connect Higgsfield to this workspace.” The agent researches the provider and prepares the whole configuration in Outloop.
You
-
Create and paste the key once
The agent can open the provider’s API key page. You create the key there and paste it into Outloop’s secure field. The agent never sees it.
You, once
-
The agent finishes and verifies
It enables the approved capabilities, runs a low-risk real request and reports the service working through Outloop.
Agent
Already stored the key in Outloop? There is nothing to paste: the agent continues from the stored state and goes straight on to finishing and verifying.
In short
A Custom API is how Outloop connects a provider that has no built-in connector — you declare the operations an agent may call, and Outloop performs them with a credential the agent never sees.
Install the Outloop Custom API Setup Skill and tell your agent which service to connect. The agent researches the provider and prepares the whole configuration in Outloop. When the API key is needed, it offers to open the provider’s API key page; you create the key there and paste it directly into Outloop, once. The agent then finishes and verifies the connection. Or configure it yourself in nine steps below.
Which path should I use?
Dedicated connector
If Outloop already has a dedicated connector for this service, use it.
It comes with provider-specific guardrails and its own setup guide.
Browse the connector guidesCustom API
If not, use Custom API.
Install the Custom API Skill and name the service. Any provider with a documented HTTPS API is a candidate.
Get the Custom API SkillNot sure? Start with the Skill anyway. It checks for a dedicated connector first and tells you to use it if one exists.
Step 1 · one time
Install the Custom API Skill
Download it here and add it to Claude, Claude Code or Codex. You don’t need to know anything about API configuration first — the Skill asks which service you want.
Outloop Custom API Setup · v1.1.1 · ZIP · 151 KB
- Claude / Cowork: Customize → Skills → Upload a skill, choose the ZIP, then enable it.
- Claude Code: extract the ZIP into
~/.claude/skills/(keeps theoutloop-custom-api-setupfolder), then start a new session. - Codex: extract the ZIP into
~/.codex/skills/, then start a new session.
Checksum and package details
Published byte-for-byte from the Outloop product build. Compare its SHA-256 before installing.
b45e802c1d258f113d3405a9adcfe7aee1f770430ca88dc1bc5bd58a9848cfb0
Then tell your agent the service
The service name is enough to start:
“Connect Higgsfield to this workspace.”
Or copy the full instruction — the same one Outloop’s Copy agent instruction button gives you. If you leave the service out, the agent asks which one.
Use the Outloop Custom API Setup Skill to connect a service to this workspace. Ask me which service, prepare everything, and when the API key is needed, tell me where to create it — I will paste it into Outloop myself.
The same instruction with the service already named
Use the Outloop Custom API Setup Skill to connect Higgsfield to this workspace with full approved capability. Prepare everything, and when the API key is needed, tell me where to create it — I will paste it into Outloop myself.
Starting from Outloop instead?
In the API Keys and Access view, the Connect any API card has the same four starting points: Download Custom API Skill, Copy agent instruction, View step-by-step guide (this page) and Set it up myself for the manual path. Both starts lead to the same Skill and the same four steps.
What happens next
After you name the service, the agent does the work. You step in once, for the key.
- Agent
Researches the provider’s official API documentation.
- Agent
Prepares the Outloop configuration: operations, their effects, authentication and file handling.
- Agent
Offers to open the provider’s official API credential page — only if you say yes.
- You
Create the API key on the provider’s page.
- Agent
Prepares the secure credential field in Outloop.
- You
Paste the key directly into Outloop. It is stored and never shown again.
- Agent
Finishes the configuration from the stored state — without ever seeing the key.
- Outloop
Verifies the provider with one real, low-risk request.
- Agent
Runs a real low-risk API action and reports what it verified.
When the key is needed, the agent says:
“I can open the provider’s API credentials page for you. You will create the API key yourself, and I will prepare Outloop so you can paste it directly into the secure credential field.”
Your key goes into Outloop — never into the chat
The API credential is created by you and pasted directly into Outloop. It is never pasted into the AI chat.
The agent never requests or receives the raw credential value in chat or model context. After opening the provider’s page it makes no call on that tab, and it learns the key is stored only from Outloop’s “never shown” line. Never paste a key into a chat, the agent, a Skill file, a .env or project file, a log, a screenshot or a generated file.
Detailed setup and reference
Everything above is enough to get started. Below: a recorded walkthrough, the manual setup, verification, troubleshooting and advanced material for complex APIs.
Recorded walkthrough: PandaDoc Sandbox (Outloop 1.36.0)
Follow Adam through a PandaDoc Sandbox setup in Claude Cowork: install the Skills, ask the agent to research and configure the API, enter the credential privately, verify a read, then create a synthetic draft and retrieve its PDF. The recording uses Outloop 1.36.0 and includes large burned-in captions and a transcript. Its screens predate the current Connect any API card; the setup model is the same.
Want to see what the worker can do before configuring access? See the PandaDoc AI-worker workflow, or explore Webflow site and CMS work with API access and browser review and Higgsfield image and video generation.
PandaDoc Sandbox: complete agent-assisted setup
10:54 · Open video full size
Two narration lines are silent in the Custom API test sequence. The screen recording and on-screen captions continue through both gaps.
Read the transcript
Hi, I'm Adam. In this video we connect a new provider through Outloop, and we do it without learning its API ourselves. We'll give the agent the setup Skills and a clear task. I'll enter the credential privately, in Outloop. And then we'll check a real result from the provider, not just a success message. I’ll start by creating a workspace for this demo. This gives the work a clear home: a specific local folder, with its own approved access. I choose Claude and Cowork, check the name and location, and let Outloop create the folder. Next, I’ll connect that exact folder in Claude. The folder location is what connects these two apps. I copy it from Outloop and reveal it in Finder. The connection instructions are already inside. Keep this folder: creating another one with the same name would not give Claude the same context. In Claude, I create a project using the folder Outloop just made. I review the permission for that folder and create the project. Then I check that Claude shows the local folder on this computer. That is the connection we need; a matching project name by itself is not enough. Before changing access, I check the workspace again. This demo uses workspace 025. Claude’s connected folder and Outloop’s selected workspace need to refer to the same place, so I know exactly where the next action will run. One thing this video assumes. The Outloop runtime package is already installed in Claude. If you haven't done that yet, it's in the First Workspace guide, and it takes about two minutes. You do not have to understand every API field yourself. I download three Skills from the guide. Outloop Custom API Setup helps the agent prepare the integration. API Integration Development supports the technical research. Custom API Operations guides approved work after setup. Keep the complete ZIP packages for installation. These are the catalog versions tested in this recording; their candidate status still matters. I use Claude’s Skills upload route and select the complete ZIP. Keep the package zipped. I review Outloop Custom API Setup and save it. Claude checks the package before installation. This recording replaces an existing copy. I check the intended package, confirm replacement and verify it is enabled. I repeat the upload for API Integration Development and check its enabled state. The catalog package version is different from Claude’s revision number. Finally, I install Custom API Operations. With all three enabled, I start a fresh task in the connected folder to test actual activation and use. Now I tell the agent the outcome I want: set up PandaDoc Sandbox for this Outloop workspace, research the official documentation, and verify a small, approved operation. I ask it to use the installed Skills. If it needs a credential, it must ask me to enter it directly in Outloop. The prompt contains no key. The agent checks PandaDoc’s official documentation before configuring anything. Here it confirms the Sandbox restrictions and that creating a draft is separate from sending it. That distinction keeps this demo’s approval narrow. The agent prepares the integration through Outloop. Here we review the definition it produced: the official destination, authentication template, and limited operations. Outloop holds the credential; the agent works with its assigned reference. This is an edited review of the completed configuration. The secure handoff comes next as an explanation of the human-only step, not a second credential entry. I confirm the provider and workspace. The credential is entered only in Outloop, with recording stopped. After it is saved and assigned, the agent continues without seeing it. Never paste the key into Claude. Validation checks the corrected definition without calling the provider. The agent saves the configuration and preflights the workspace’s allowed operation. Then a real provider request checks whether the integration actually works. Outloop shows the saved configuration, assigned credential and fresh provider verification. Match that evidence to the intended operation and workspace. Here is the same first-task receipt again: workspace 025, the matching request, HTTP 200, and no secret exposure reported. I hold it here so we can inspect the result. Let’s look at what the agent prepared. The connection uses PandaDoc’s HTTPS API origin, and the authentication template refers to a credential kept in Outloop. The read operation defines its path, inputs and response type. Here the query is constrained to our synthetic demo. Validate checks the definition, without calling PandaDoc. I’m reviewing the existing integration, so I close this inspection without saving unnecessary changes. The test panel prepares a request for one declared operation. Here I choose the bounded demo inputs and copy the generated prompt. Copying it does not call PandaDoc. The connected Cowork task provides the real read receipt. I check the workspace, request and HTTP 200 result. This receipt is reused from the first-task demonstration. The agent checks that exact document’s state. It has reached document dot draft. I open the file and inspect the Sandbox watermark and blank sample fields. This is the concrete output of the approved operation. This draft downloaded successfully. Other states can behave differently, so check readiness and the permitted download route. Here I remove the HTTPS prefix in an unsaved diagnostic draft. Validation tells me exactly what is wrong. I restore the official HTTPS origin and validate again. The definition is valid now, but that is not a provider test. I close the unsaved draft, leaving the verified service intact. The agent researched it, configured it, and verified it. I approved each step, and I entered the credential where only Outloop can see it. Then I checked the real result. That's the pattern for every provider you connect.
Use this as the core setup example. Shared definitions, dynamic filename rules and indirect artifact retrieval are explained below; the video does not demonstrate every authentication kind or provider.
Two ways to set this up
Both paths end in the same place: an approved service in one workspace, with declared operations, a credential you pasted into Outloop, and one real provider operation that completed. What differs is who does the clicking.
- A.Let the Setup Skill do it — recommended. You name the service; the agent researches the provider and prepares everything in the Outloop dashboard. You step in once, to create the API key and paste it into Outloop.
- B.Set it up myself. The nine steps below, in order, for configuring without an agent. It is not a prerequisite of path A — but it is the same nine steps, and it is how you check the agent's work.
A. Let the Setup Skill do it
Start with a local project connected to the same folder in Outloop and your agent. If that is not ready, follow Connect the same folder and Install the Runtime Plugin first.
1. Install the Custom API Skill
Use the download above — one Skill is all the setup needs. In Claude or Cowork, open Customize → Skills → Upload a skill, choose the ZIP and enable it, then start a fresh task in the connected project so the Skill can load.
Install a setup Skill (recorded with Outloop 1.36.0)
2:17 · Open video full size
Read the transcript
You do not have to understand every API field yourself. I download three Skills from the guide. Outloop Custom API Setup helps the agent prepare the integration. API Integration Development supports the technical research. Custom API Operations guides approved work after setup. Keep the complete ZIP packages for installation. These are the catalog versions tested in this recording; their candidate status still matters. I use Claude’s Skills upload route and select the complete ZIP. Keep the package zipped. I review Outloop Custom API Setup and save it. Claude checks the package before installation. This recording replaces an existing copy. I check the intended package, confirm replacement and verify it is enabled. I repeat the upload for API Integration Development and check its enabled state. The catalog package version is different from Claude’s revision number. Finally, I install Custom API Operations. With all three enabled, I start a fresh task in the connected folder to test actual activation and use.
Claude Code and Codex folder installation
Unpack the complete package into your runtime's skills folder:
Personal   ~/.claude/skills/outloop-custom-api-setup/
Project    .claude/skills/outloop-custom-api-setup/
Invoke     /outloop-custom-api-setup
Personal   ~/.codex/skills/outloop-custom-api-setup/   (also ~/.agents/skills/)
Project    .agents/skills/outloop-custom-api-setup/
Invoke     $outloop-custom-api-setup
Optional companion Skills
- API Integration Development — Helps the agent interpret official endpoints, pagination, rate limits, asynchronous states, uploads, downloads, errors and provider response structures.
- Custom API Operations — Guides access preflight, approved reads and writes, result verification and read-back through the configured Custom API.
Useful for deeper API design and for day-to-day work after setup. The recorded walkthrough installed all three; the setup itself needs only the Custom API Skill.
2. Confirm the browser and runtime are ready
The Setup Skill operates the visible Outloop dashboard through the browser path approved for your runtime. Follow the current Skill package and Outloop readiness instructions. A Codex user — or a Claude Code user without the Chrome extension — registers the Outloop Managed Browser once:
agent-secrets browser mcp
Registration is operator setup, separate from connecting a provider. Installing a Skill does not prove that its browser path or the provider connection works; confirm both in a fresh task.
3. Tell your agent which service
Open the runtime in the client folder and name the service — or send the open instruction and let the agent ask:
Use the Outloop Custom API Setup Skill to connect a service to this workspace. Ask me which service, prepare everything, and when the API key is needed, tell me where to create it — I will paste it into Outloop myself.
Ask the agent to connect a provider
0:36 · Open video full size
Read the transcript
Now I tell the agent the outcome I want: set up PandaDoc Sandbox for this Outloop workspace, research the official documentation, and verify a small, approved operation. I ask it to use the installed Skills. If it needs a credential, it must ask me to enter it directly in Outloop. The prompt contains no key.
The agent researches the provider’s official documentation and prepares the whole configuration in Outloop: operations, their effects, authentication, async and file handling. It configures every operation the provider legitimately supports (GET, POST, PUT, PATCH) and defines its DELETE operations; deletion is switched on only when you ask for full approved capability or for deletes.
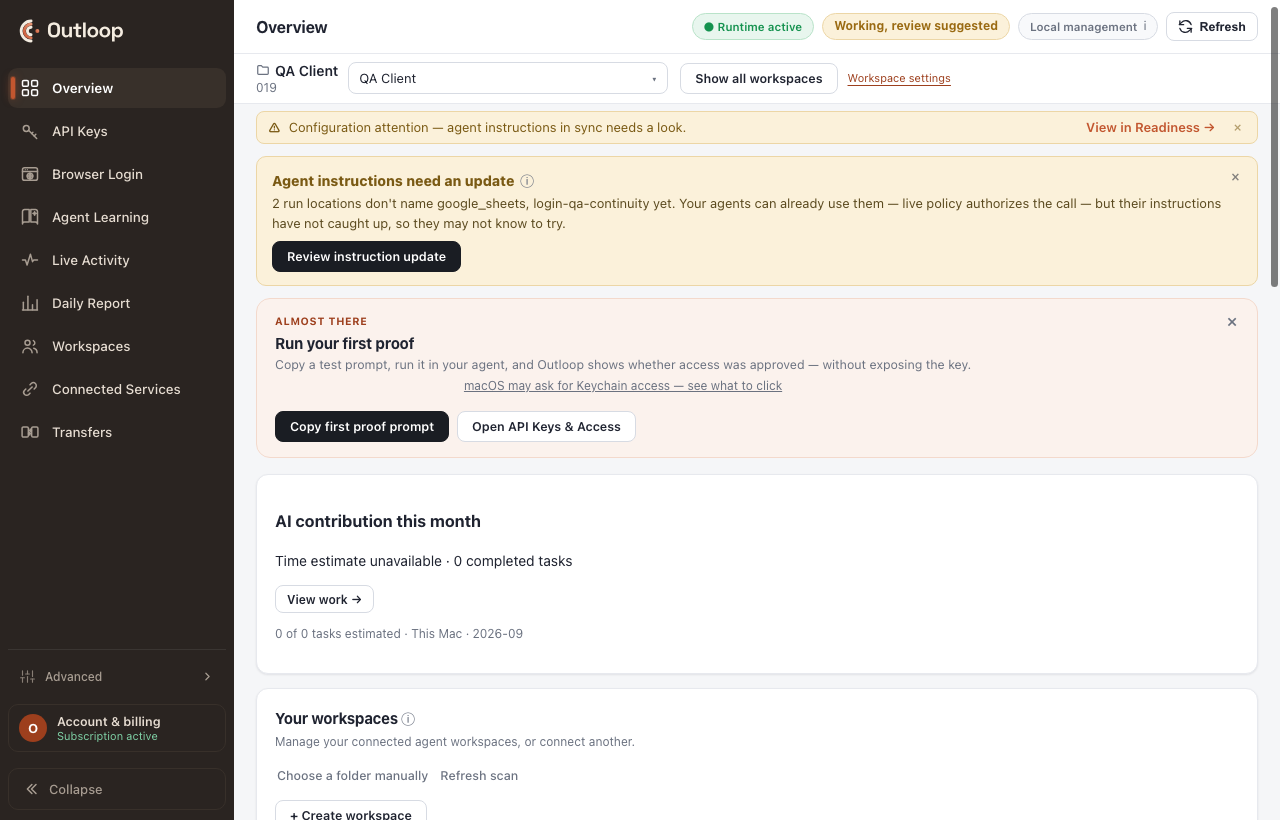
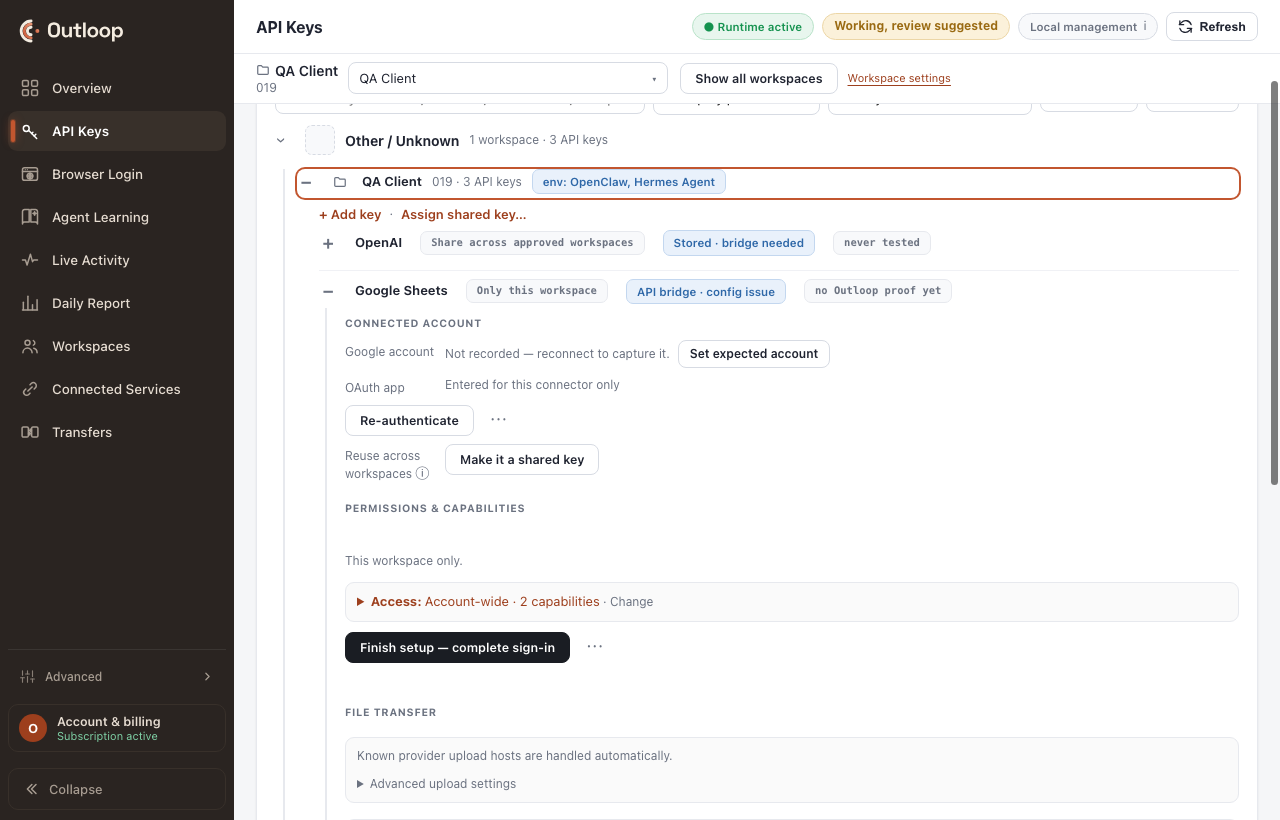
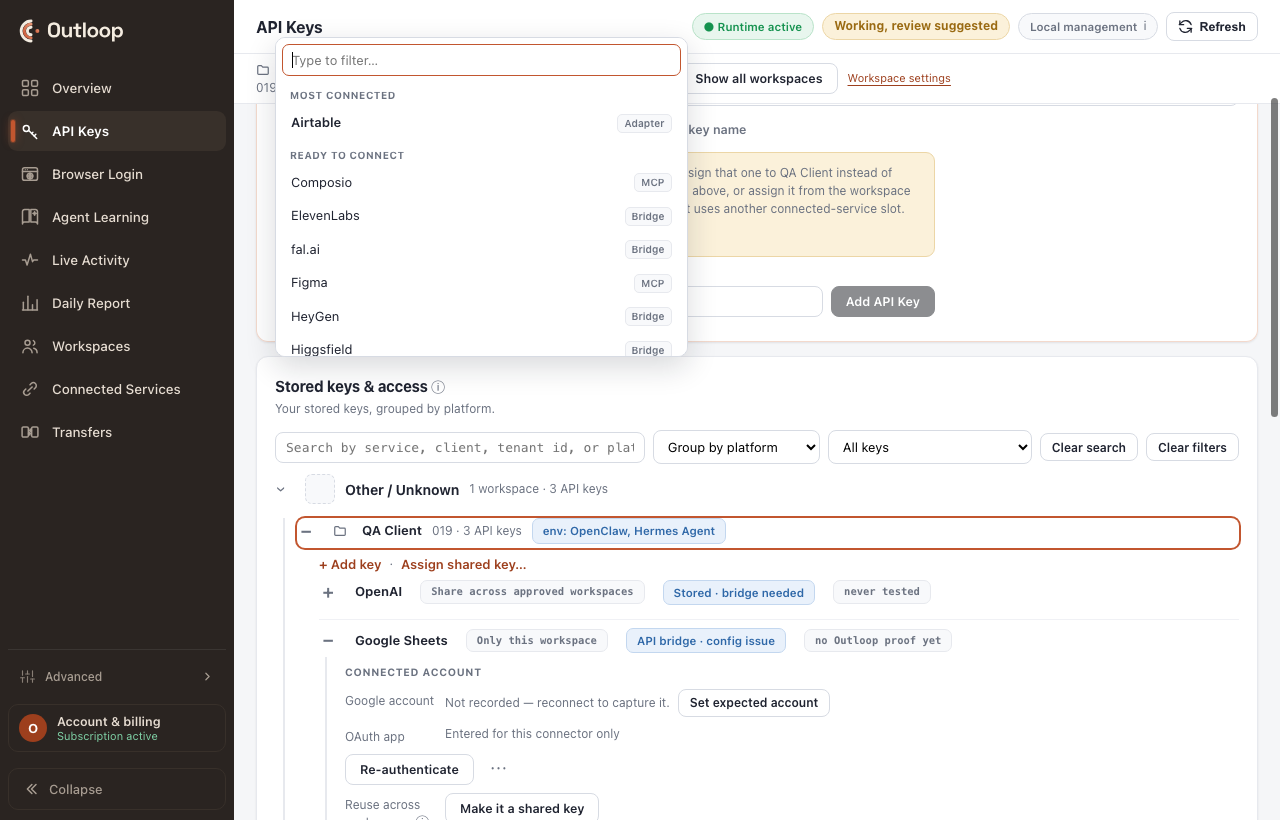
4. Create the key and paste it into Outloop
- →The agent opens the provider page only after you say yes, and only an https address on the provider’s own domain, taken from its official documentation.
- →It opens the page where you create a key, in a new tab, tells you in one line where to click, and switches back to Outloop. If that page would show existing keys unmasked, it gives you the menu path instead.
- →After opening it, the agent makes no call on that tab at all. If anything is unclear, it asks you — it never looks.
Enter the credential privately
0:24 · Open video full size
Read the transcript
I confirm the provider and workspace. The credential is entered only in Outloop, with recording stopped. After it is saved and assigned, the agent continues without seeing it. Never paste the key into Claude.
5. The agent finishes and verifies
Once Outloop holds the key, the agent continues on its own: it binds authentication, enables the approved capabilities, reloads the API Keys view, runs a low-risk real request through Test provider, and reports the service working through Outloop — or the exact reason it is not yet. Workspace access and the destructive-actions switch stay your decisions; nothing is switched on silently. Privacy deletion stays disabled — there is no Custom API control for it.
B. Set it up myself — the nine steps
1. What are you connecting?
Name the provider and what the agent should accomplish. The outcome decides which operations count as complete — it is the thing every later step is measured against, and it is why "connect the API" is not a finishable request on its own.
2. Setup path
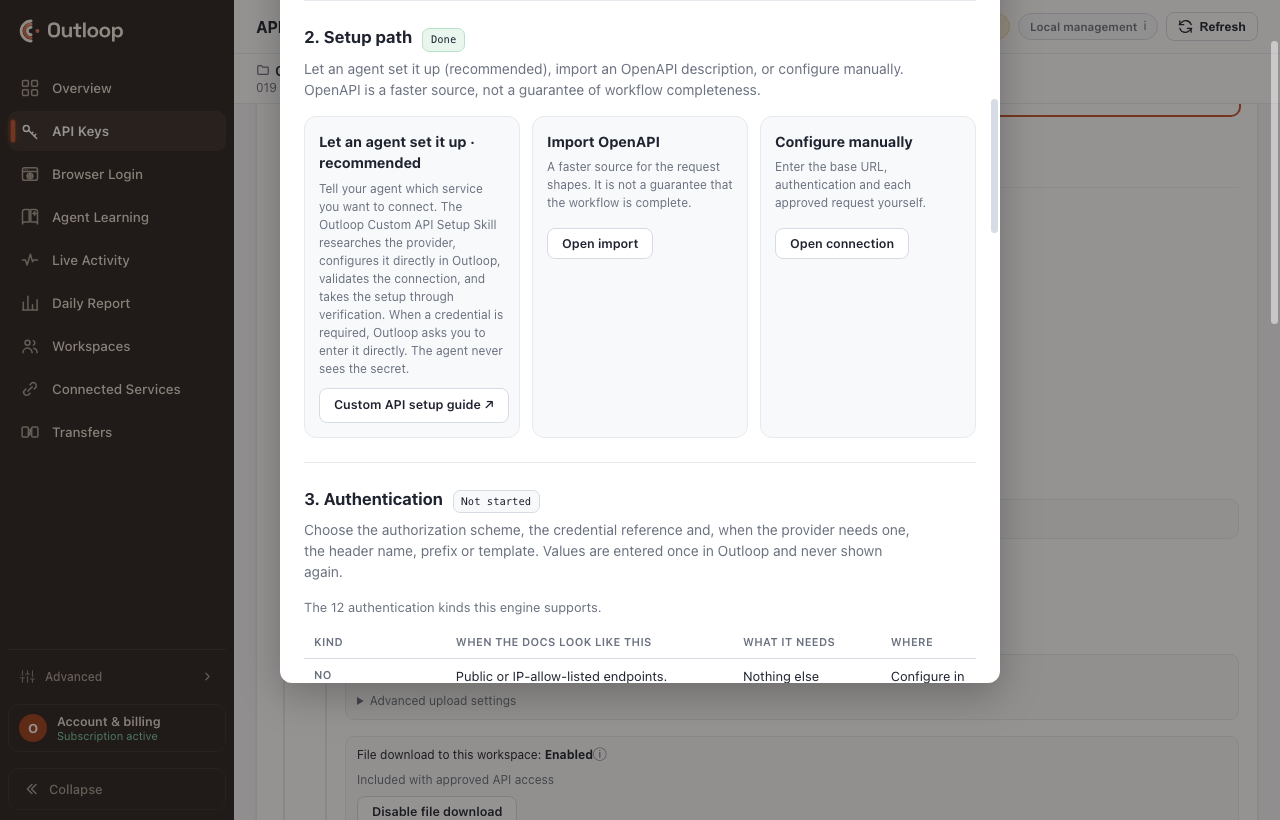
Three ways in: let an agent set it up (recommended), import an OpenAPI description, or configure manually.
If the official specification won’t apply — the importer asks you to map a security scheme you don’t use, or marks core operations unsupported — see When the official specification won’t apply. Saving has two shapes: the first save of a large change opens Review shared configuration changes with a Confirm and save button listing every operation added; later small saves commit directly.
Then the creation card: a service name and the documented HTTPS base URL, including the version prefix the provider publishes. A missing version prefix is the single most common cause of a 404 on every path.
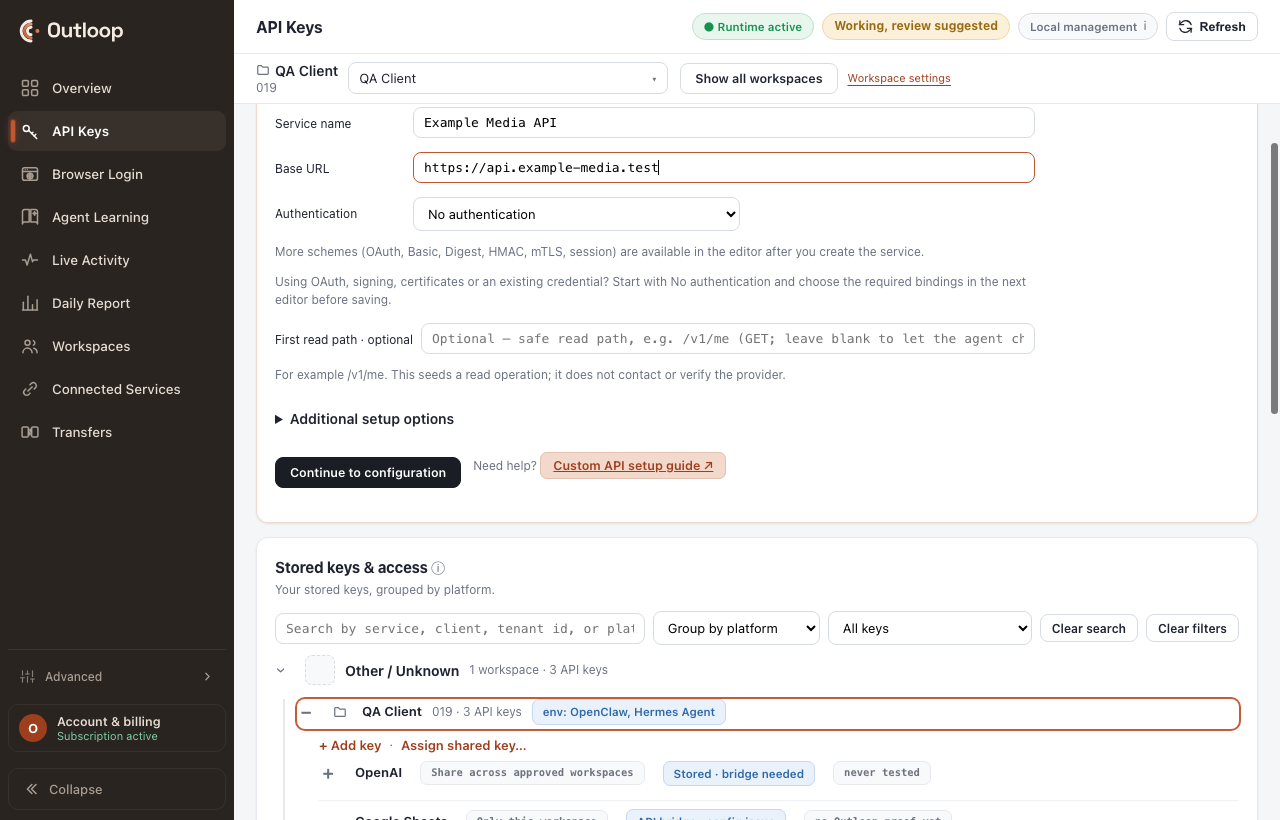
The agent configures the API
0:40 · Open video full size
Read the transcript
The agent prepares the integration through Outloop. Here we review the definition it produced: the official destination, authentication template, and limited operations. Outloop holds the credential; the agent works with its assigned reference. This is an edited review of the completed configuration. The secure handoff comes next as an explanation of the human-only step, not a second credential entry.
3. Authentication
Choose the authorization scheme, the credential reference and — when the provider needs one — the header name, prefix or template. Values are entered once in Outloop and never shown again.
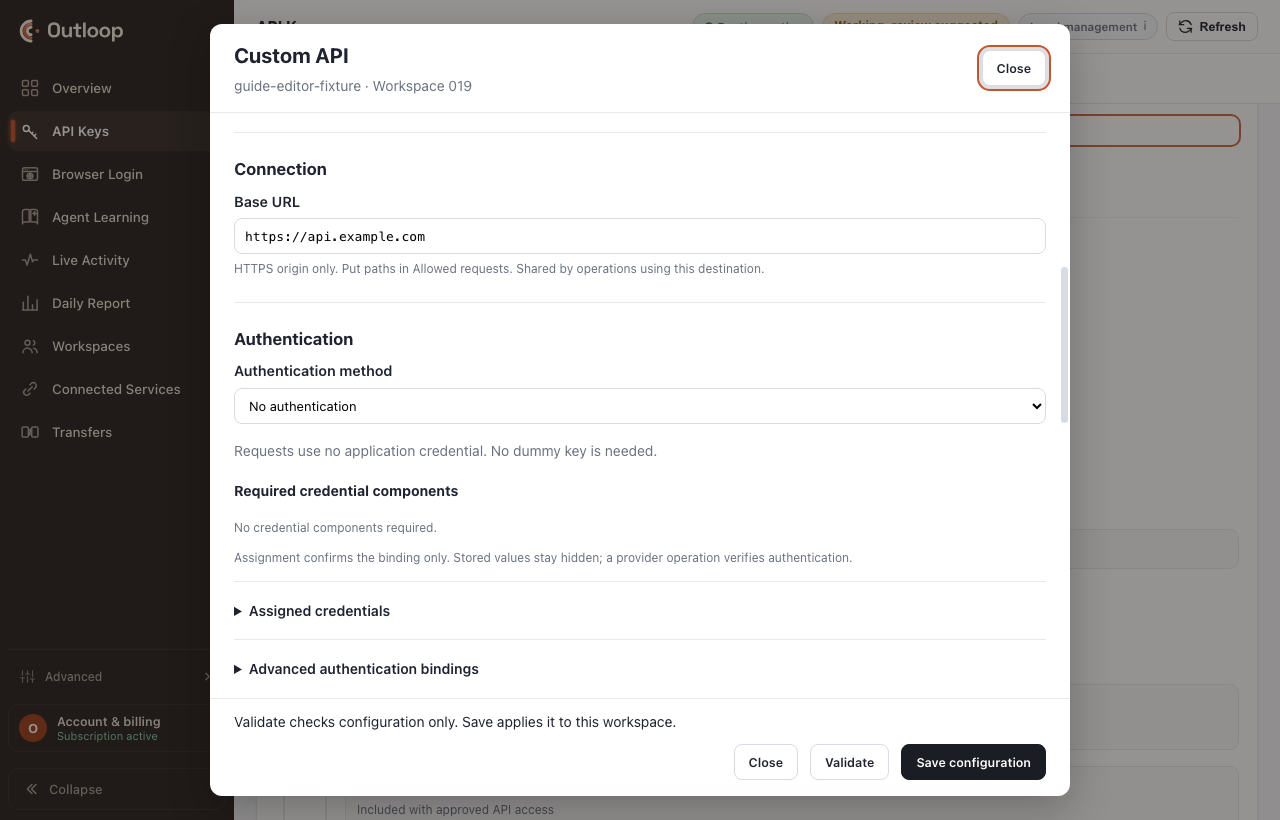
The twelve authentication kinds
The "use it when" column is deliberately the question you can answer from the provider's own documentation. Kinds marked JSON-only are configured in Advanced JSON today — there is no form for them yet, and saying otherwise would waste your afternoon.
| Kind | Use it when | What it needs | JSON-only |
|---|---|---|---|
| No authentication | Public or IP-allow-listed endpoints. | — | |
| Bearer token | The docs say an Authorization header carrying “Bearer <token>”. | Credential. | |
| API key / custom header | The docs name a header such as X-API-Key, or a prefixed Authorization value such as “API-Key …” or “Key <id>:<secret>”. | Credential, header name, prefix, template or parts. | |
| API key in query parameter | The docs put the key in the URL, for example ?api_key=… | Credential, parameter name. | |
| Basic · username and password | The docs say HTTP Basic; the username is non-secret and the password is the credential. | Username, password credential. | |
| Credential in request body | The provider expects the key inside a JSON or form field. | Credential, field pointer. | |
| OAuth · refresh token | You hold a long-lived refresh token and the provider exchanges it at a token endpoint. | Refresh credential, client credentials, token endpoint. | Advanced JSON |
| OAuth · client credentials | An application (not a user) obtains an access token with a client id and secret. | Client id credential, client secret credential, token endpoint. | Advanced JSON |
| Digest · challenge authentication | The provider answers 401 with a WWW-Authenticate: Digest challenge. | Username, password credential, probe operation. | Advanced JSON |
| HMAC / request signing | Requests must be signed (RFC 9421, AWS SigV4 or a documented recipe). | Signing credential, signing recipe. | Advanced JSON |
| mTLS · client certificate | The provider requires a client certificate; it can accompany another kind. | Certificate credential, private key credential. | Advanced JSON |
| Session · login then reuse | A login call returns a session value reused on later calls — common with SOAP. | Login operation, capture pointer, reuse rule. | Advanced JSON |
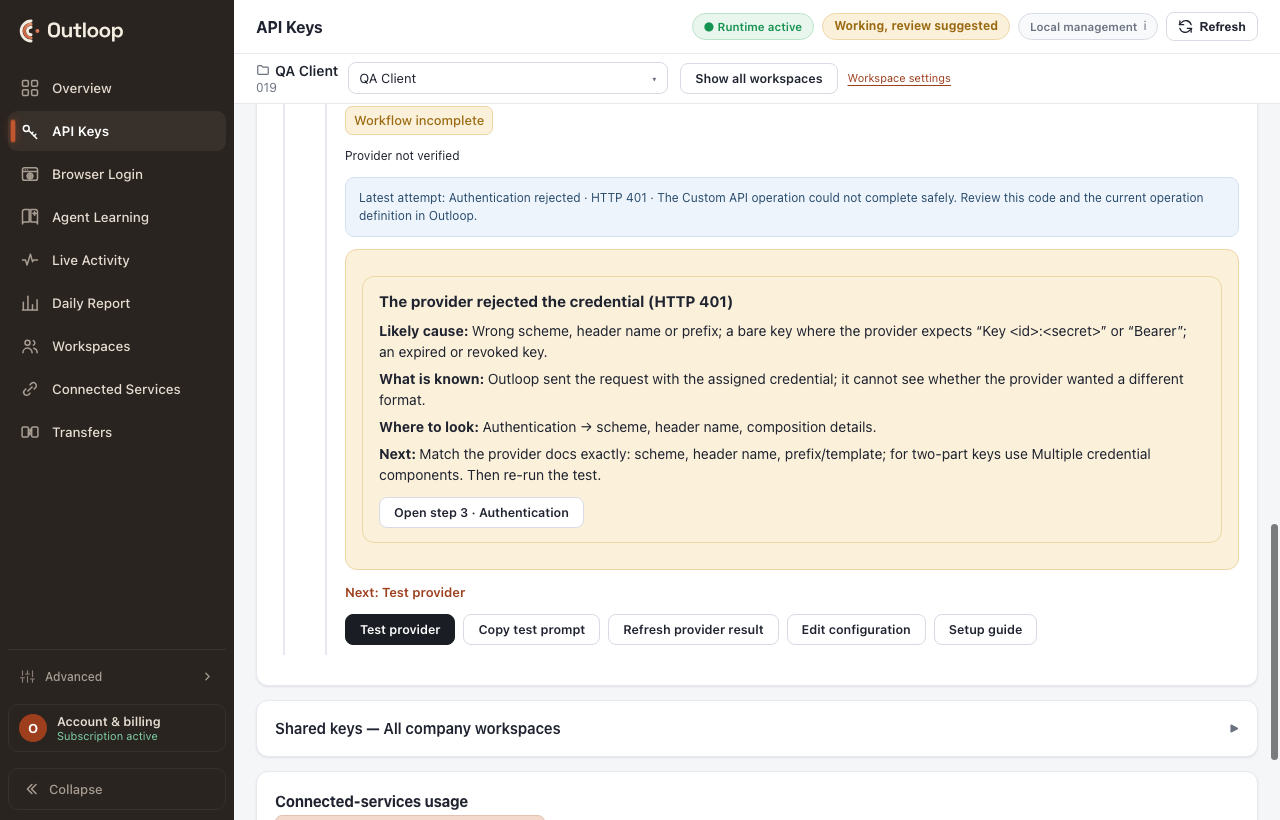
Authorization: API-Key <key> or Key <id>:<secret>,
sending the value bare can cause a 401. Check composition before replacing
the credential. A 401 can also mean an expired or invalid credential. Use the value template, or
Multiple credential components for a two-part value.
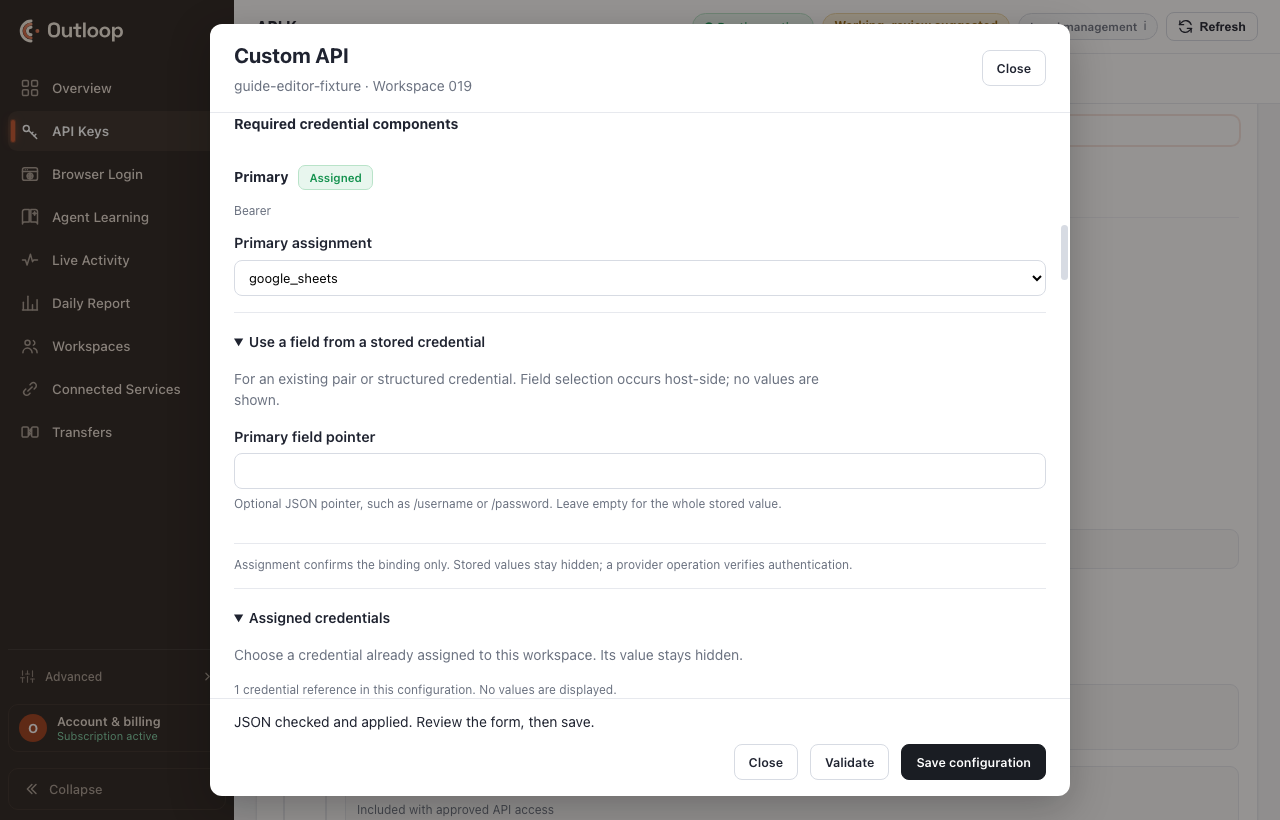
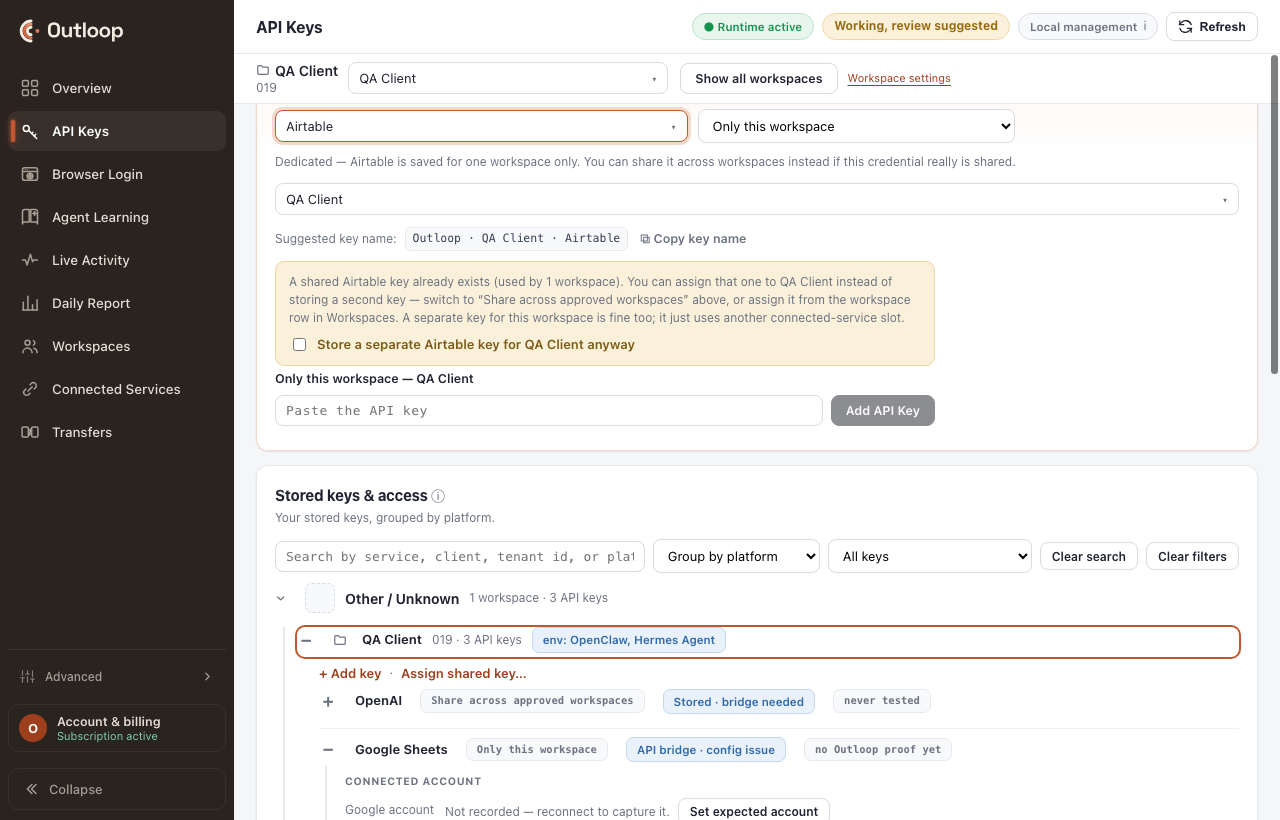
The credential reference, and the one place a credential is typed
The configuration names a reference — a name standing for a value. The value itself is entered once, in Outloop, by a person, and is never displayed again.
4. Workflow readiness
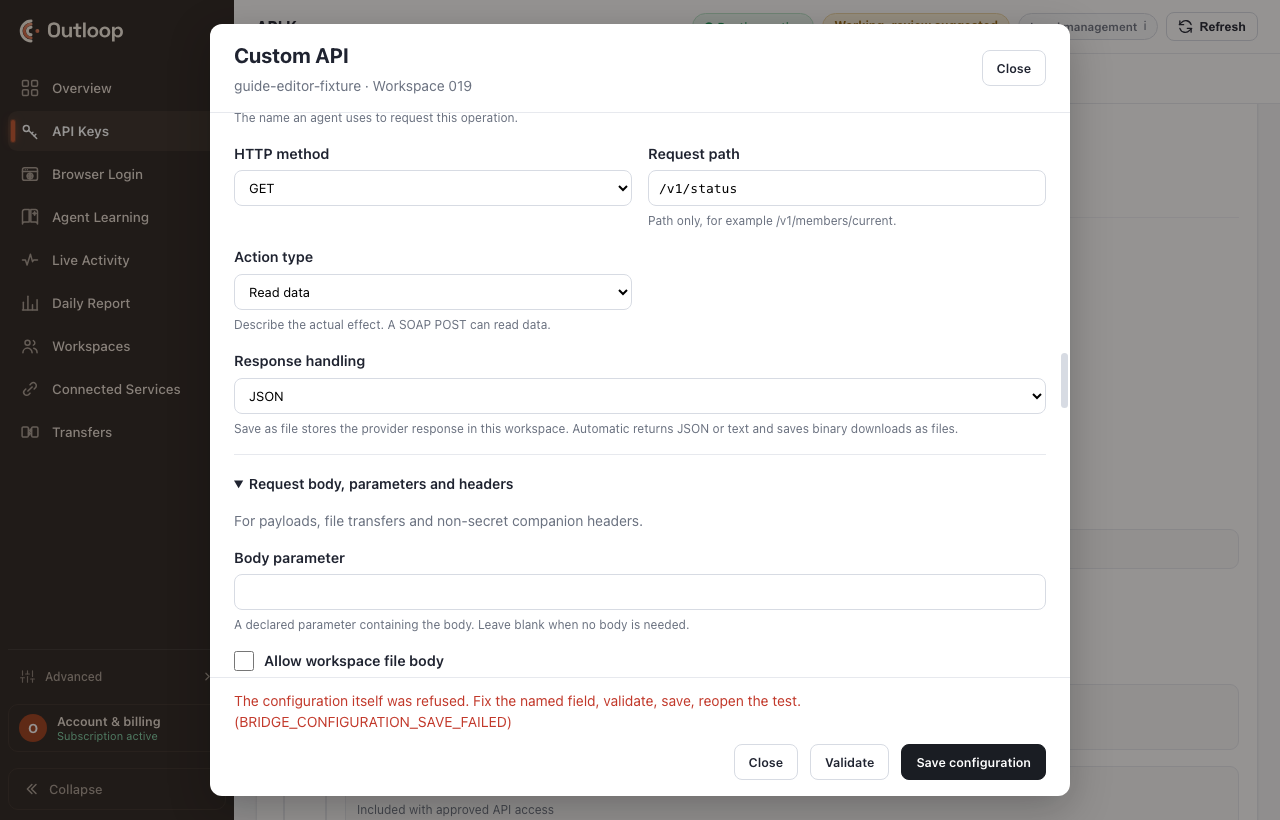
Operations are approved request shapes: method, path, effect, parameters, response handling. Nothing outside the grid can be called, by anyone.
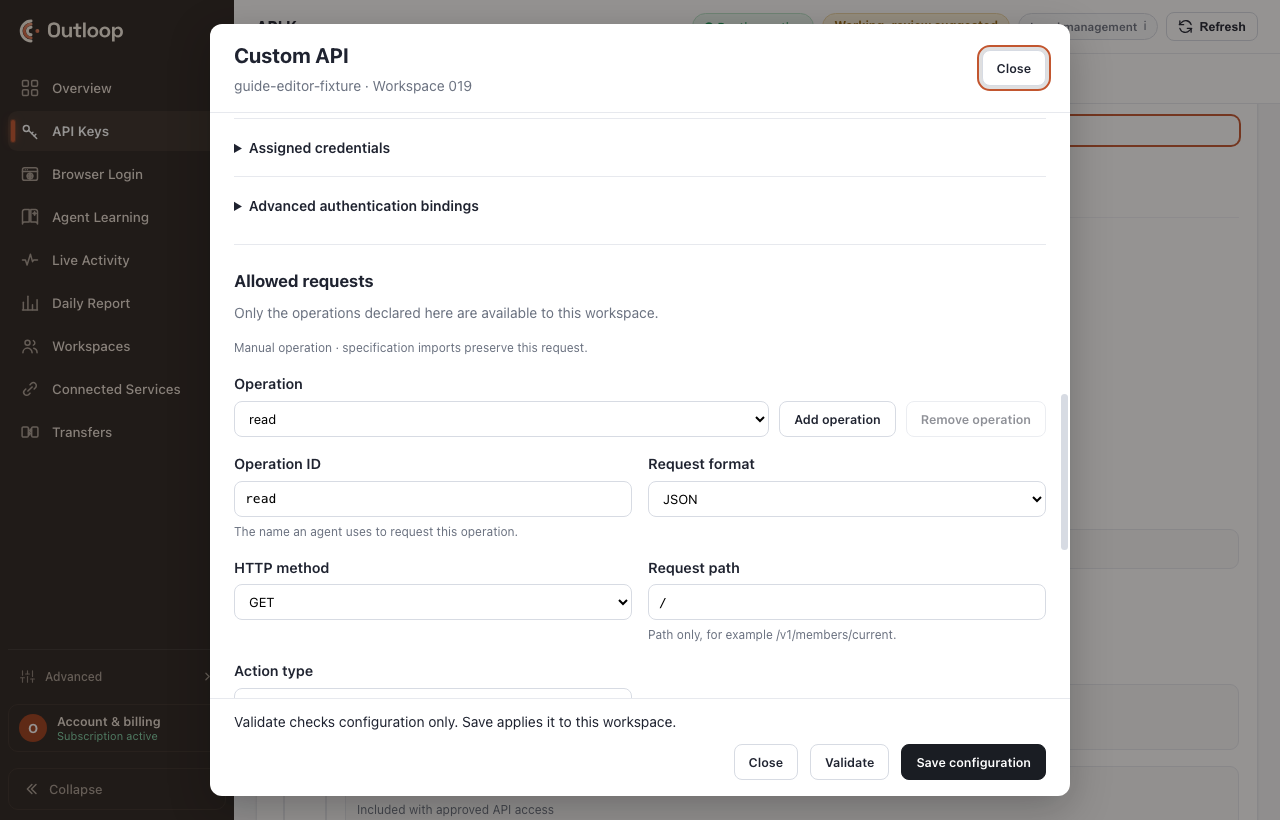
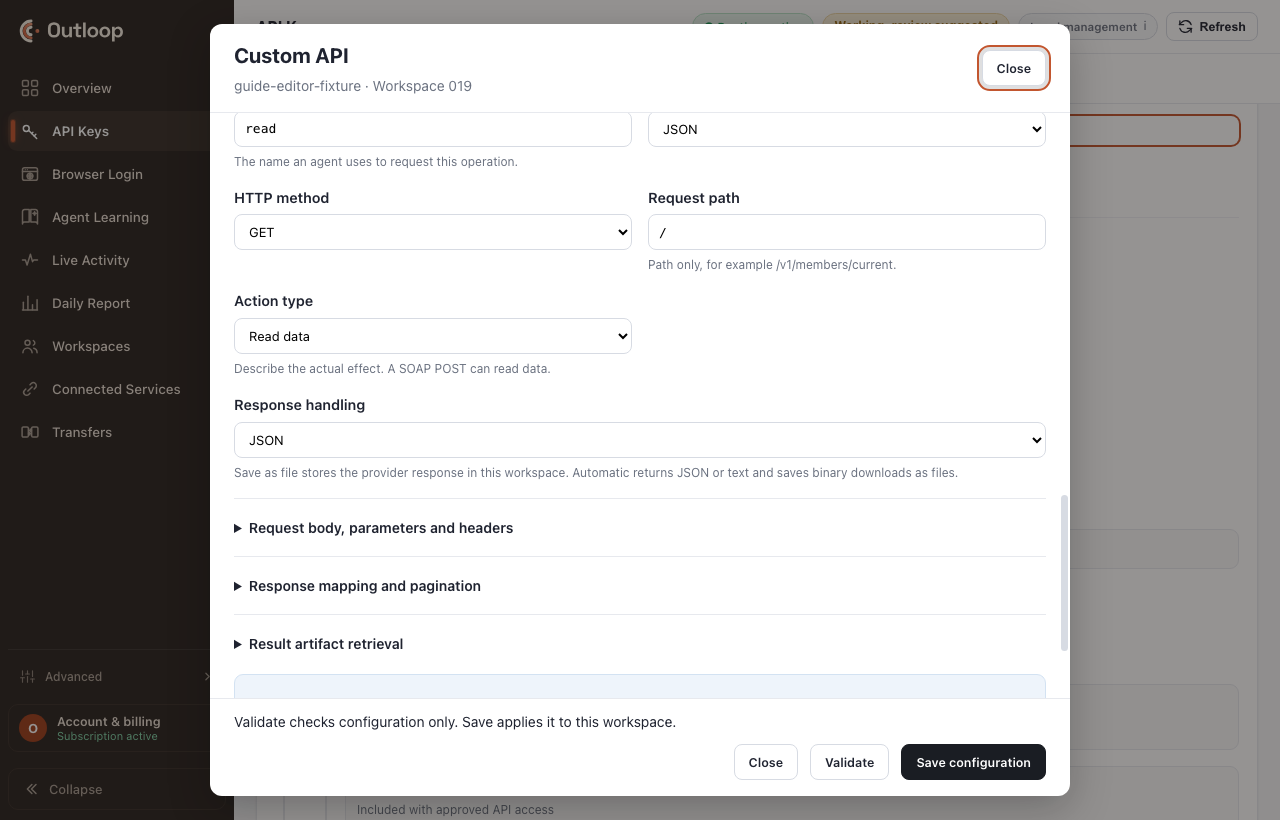
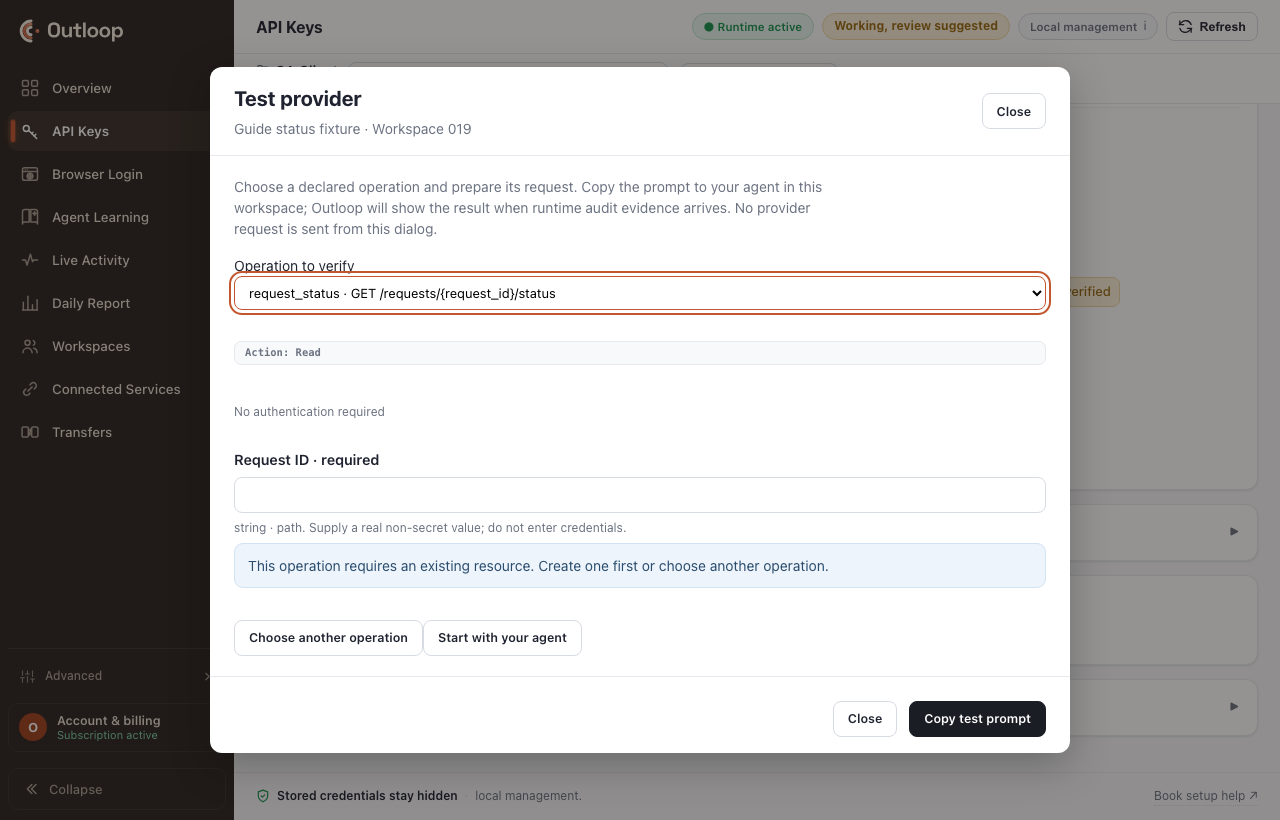
Declare typed inputs and explicit path, query and body bindings. Put query parameters in their bindings, not a query string appended to the operation path. Required inputs and resource permissions are checked before a request can run; a file body must also satisfy the declared payload rules.
Readiness then measures every capability the intended workflow needs against what is present and what is still missing. A status operation alone cannot create anything — a configuration that can check a job and cannot start one can never be exercised, because the id the status read requires has no producing operation.
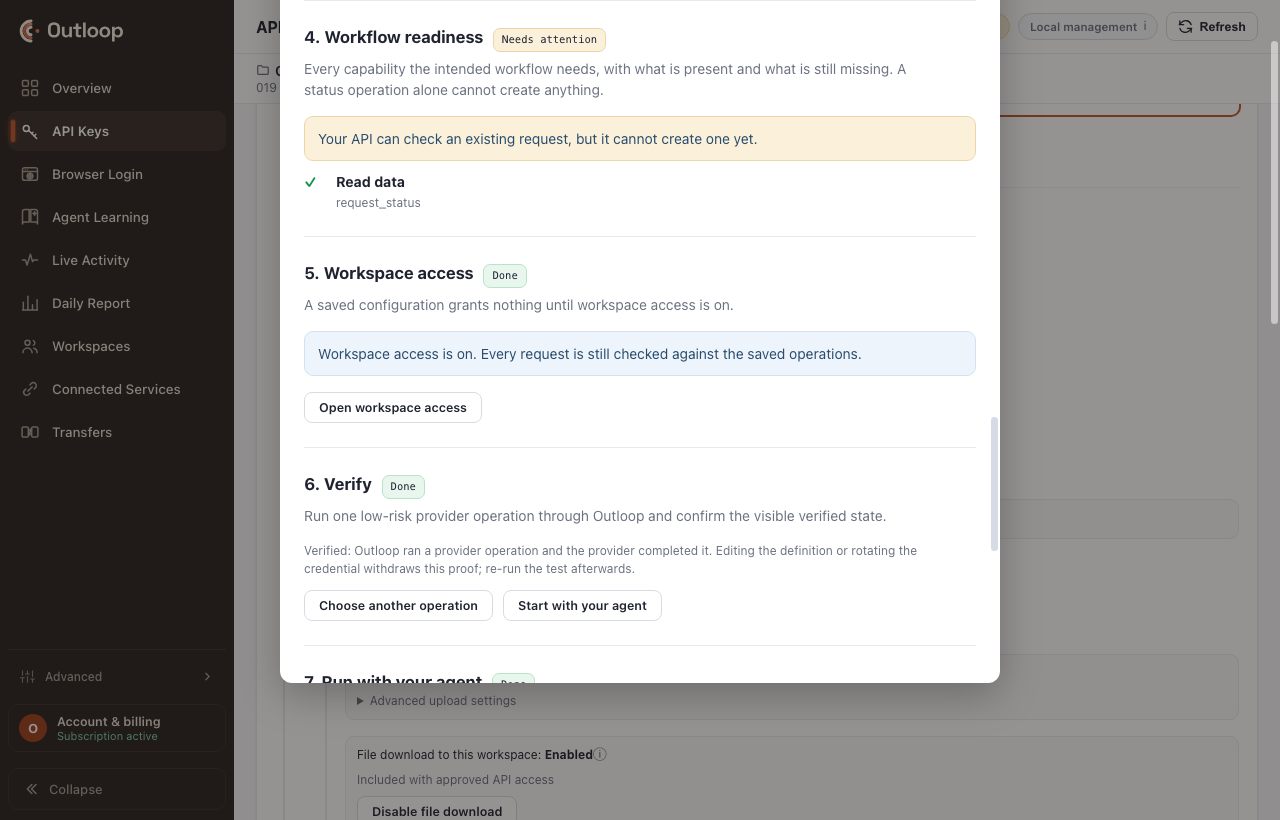
5. Workspace access
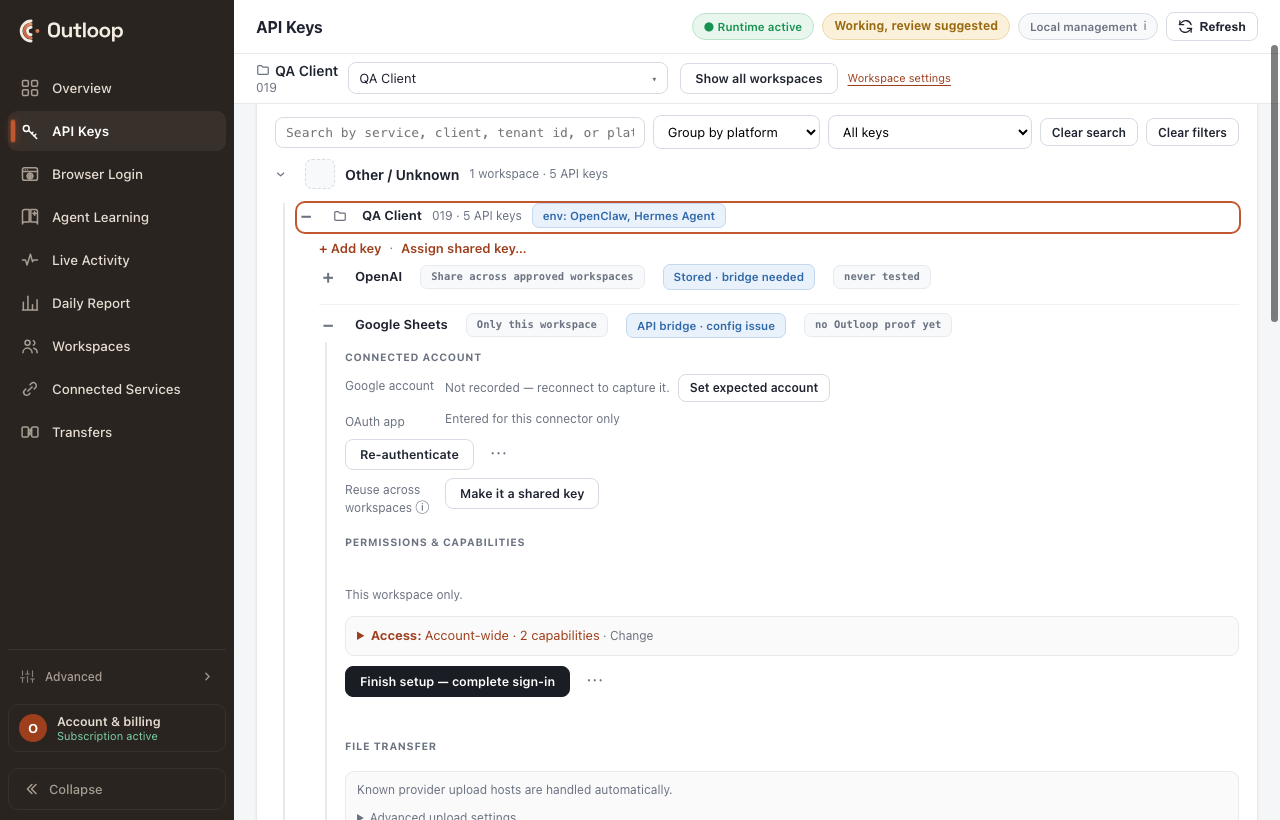
BRIDGE_NOT_ENABLED — locally, before any request leaves your Mac and before any
credential is read. Saving is storage. Access is permission. They are different acts.
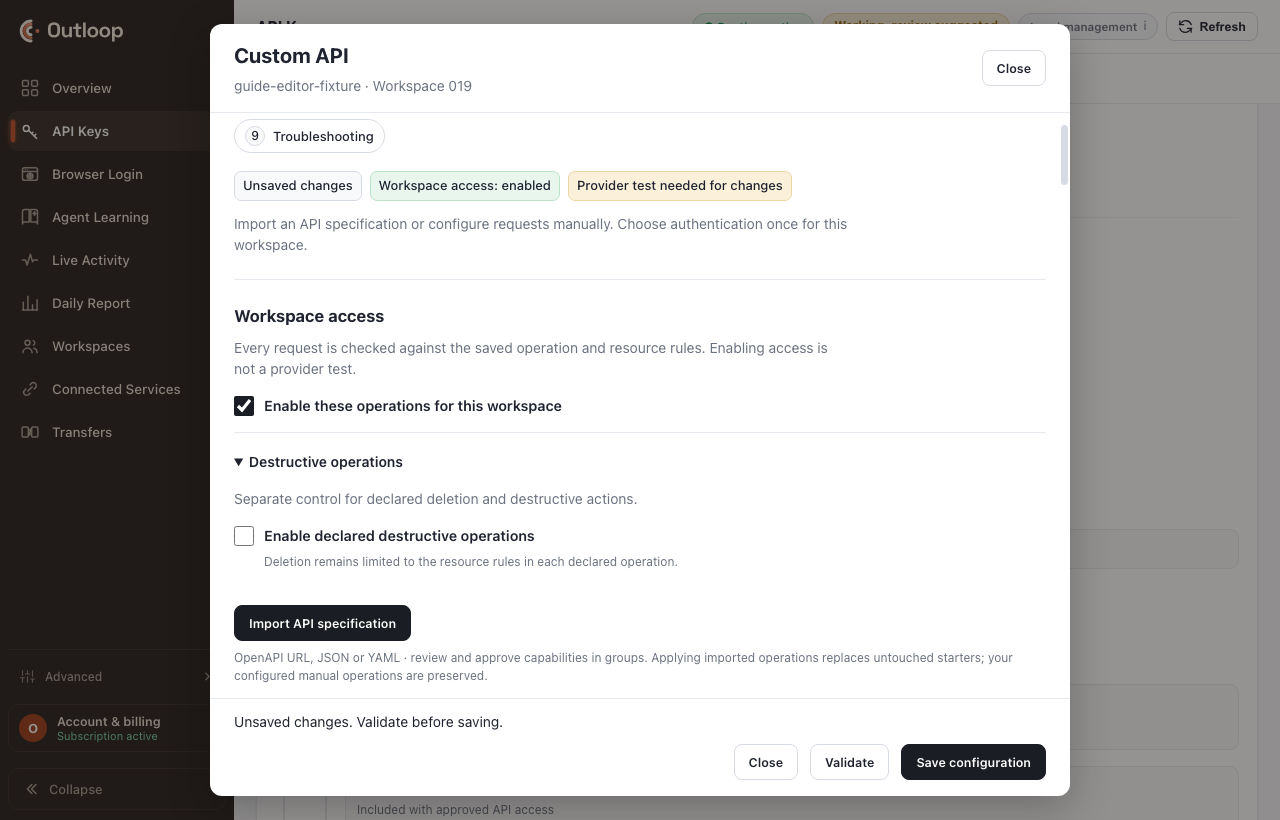
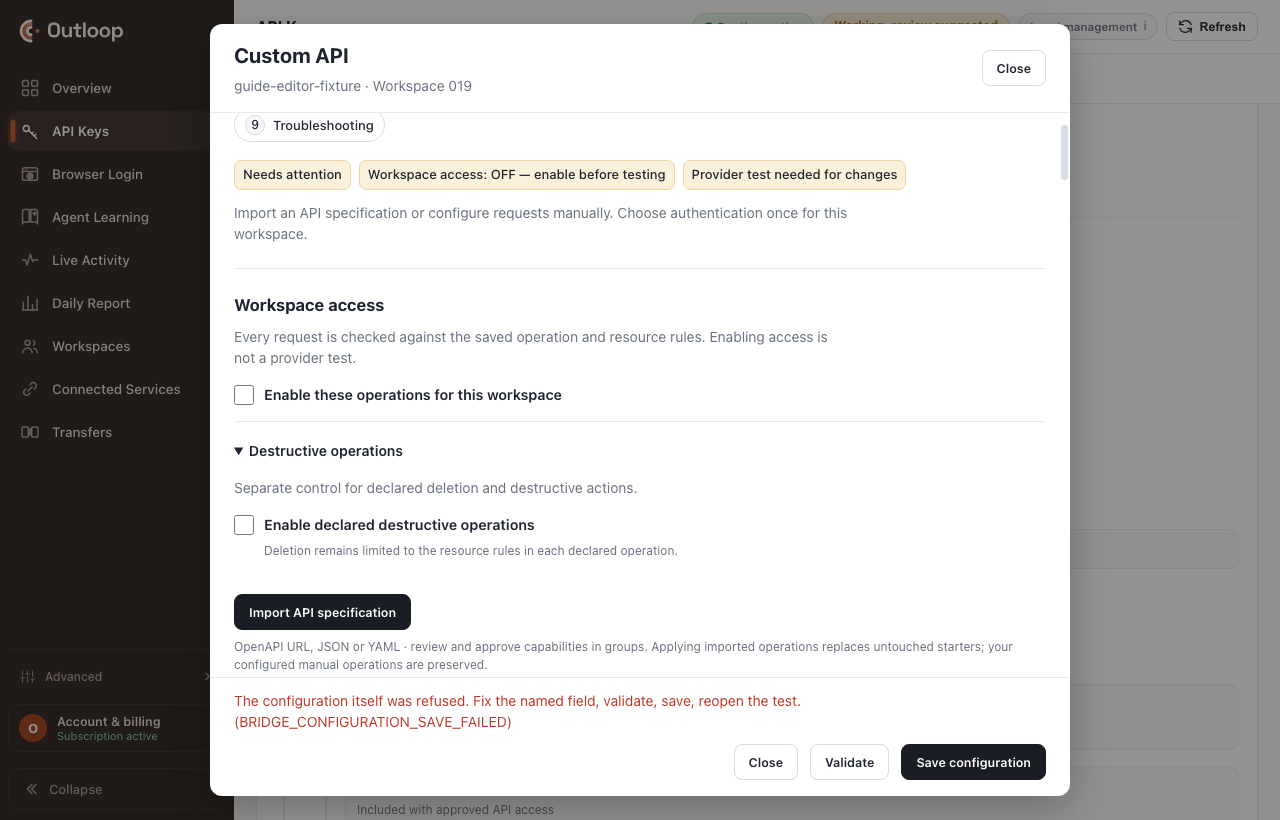
Turning destructive operations on or off is also a workspace permission. It does not change the definition: in the tested Webflow setup, enabling destructive operations left the provider verification in place.
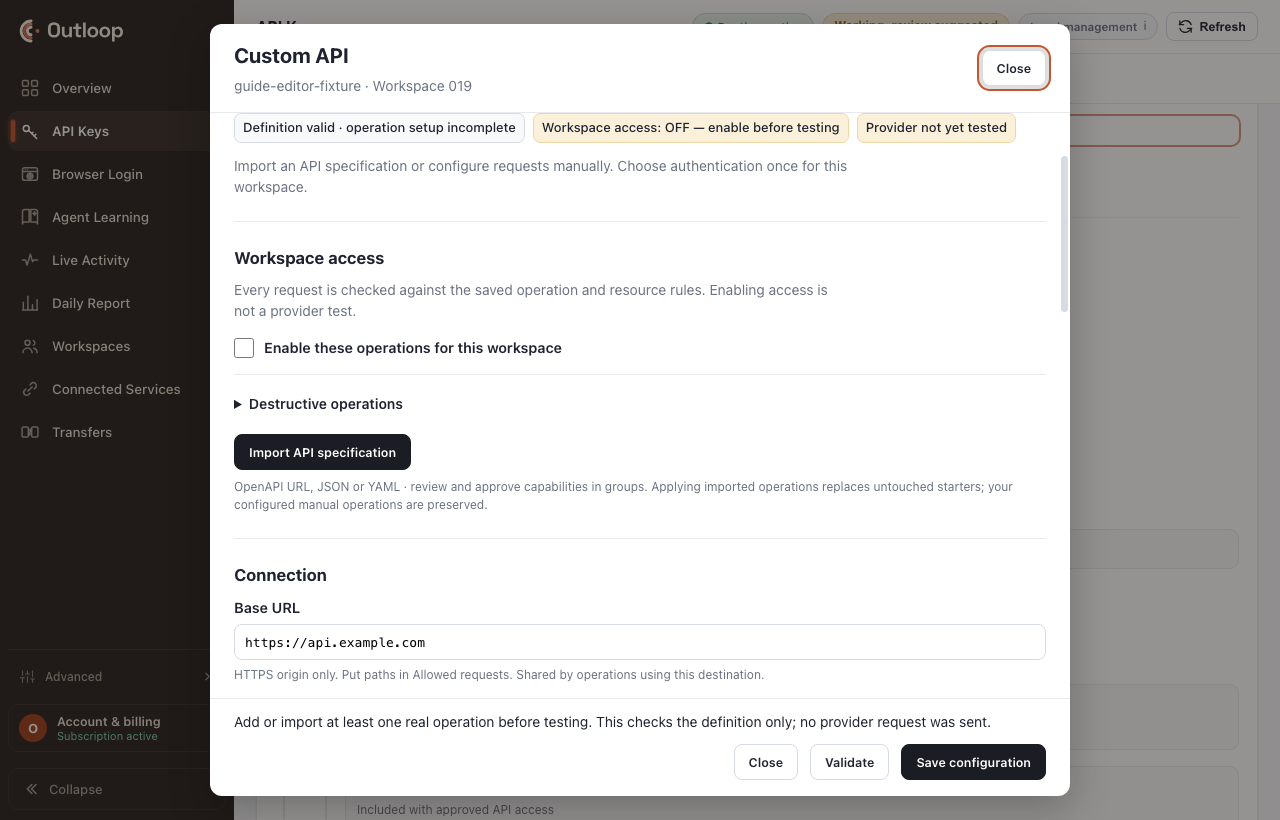
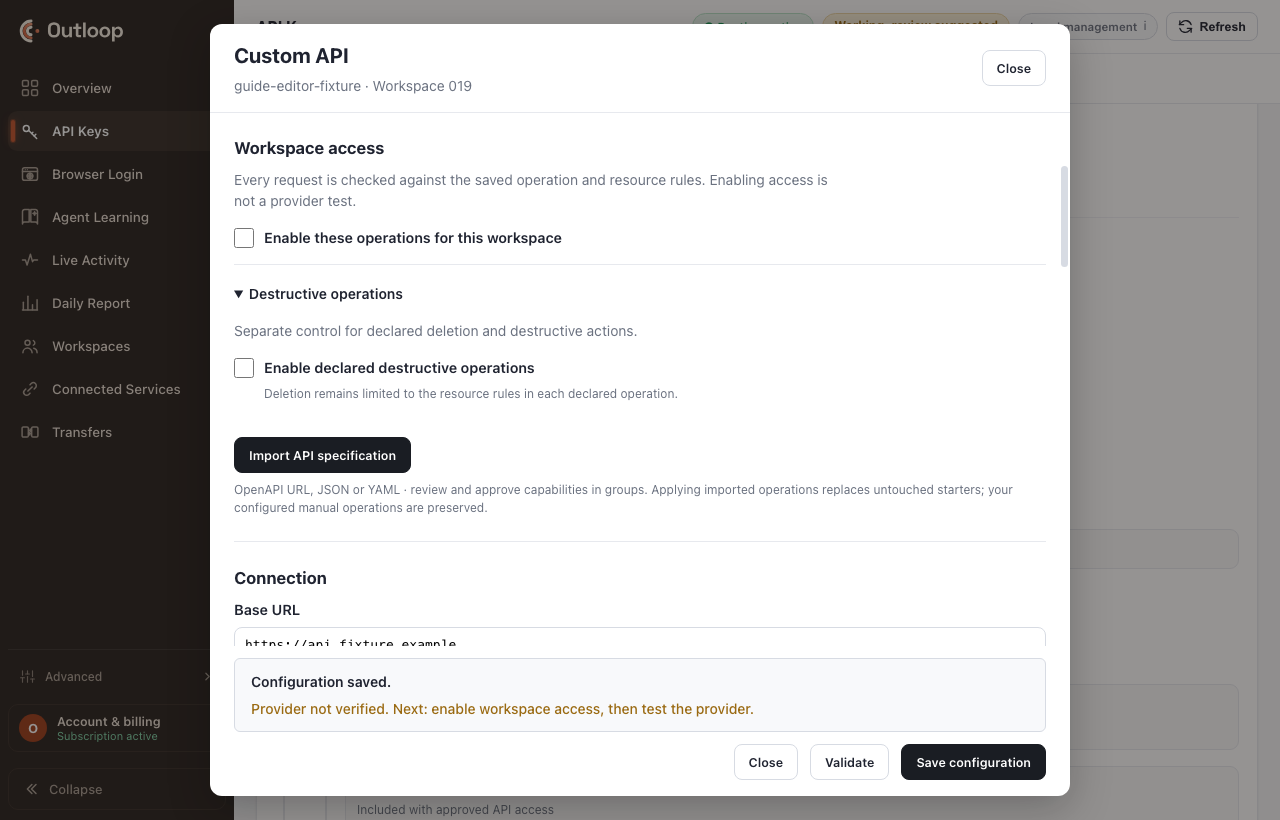
Then validate and save. Validation is local, and an incomplete result is a neutral fact that names the field.
Setup is six independent facts, never one light
For Custom API setup, check each of these facts independently. A connection label elsewhere in the dashboard does not prove that this workflow is complete.
| State | What it means on its own |
|---|---|
saved | The configuration validated locally and was stored. |
operations_configured | At least one operation is declared, with its effect classified. |
credentials_complete | Every credential component the authentication kind needs has a stored value. |
enabled | Workspace access is on, so this workspace may call the configuration. |
provider_verified | One real provider operation completed against this exact configuration and credential. |
workflow_ready | Every capability the intended outcome needs is present — not just a status read. |
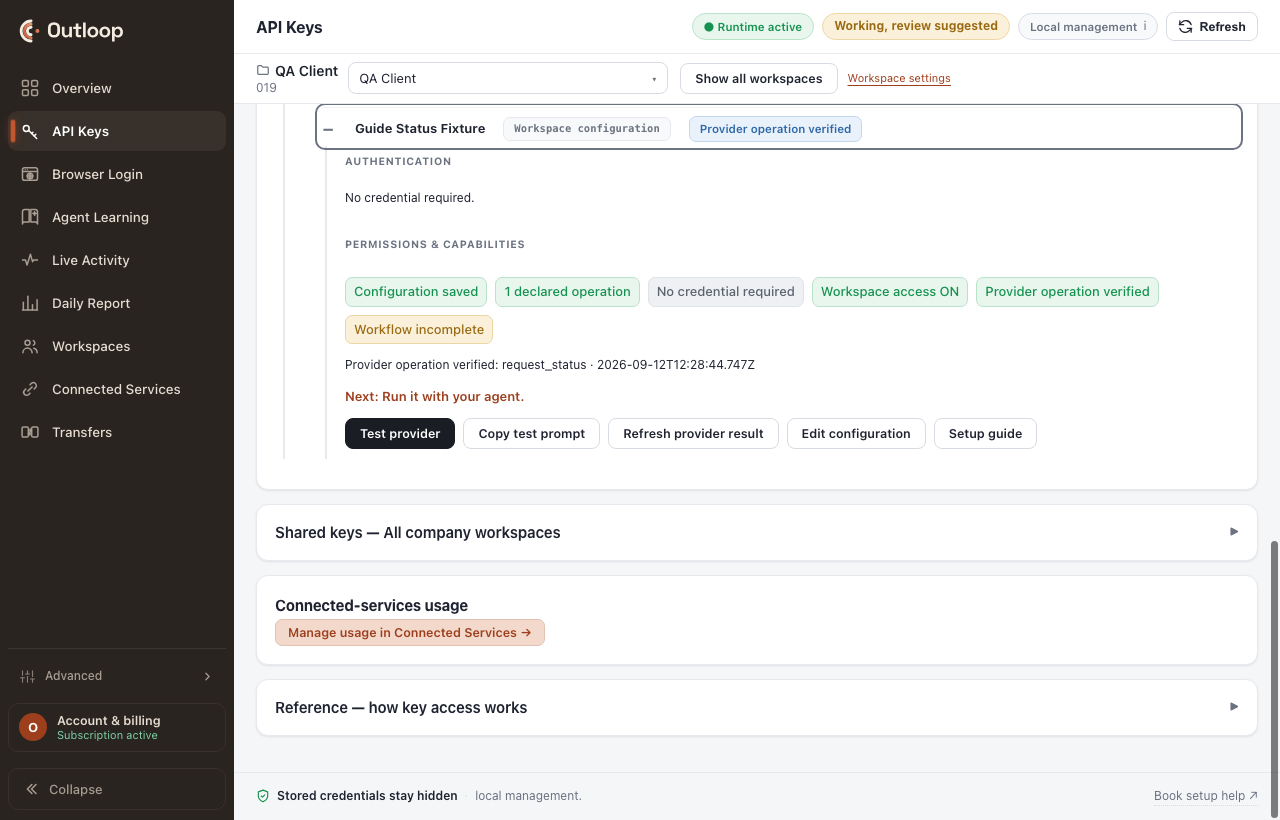
Reuse an API across workspaces
A Custom API now has a reusable service definition and a separate assignment for each workspace. The definition describes the provider, authentication references and operations. Each workspace keeps its own credential access and resource permissions. Saving a definition is not provider verification.
- Save the definition. A reviewed save creates the reusable definition and its assignment to the selected workspace. An existing legacy configuration converts when you review and save it.
- Assign it to another workspace. Choose the target workspace and check its assigned credentials. Review its resource IDs separately: assignments do not copy another workspace’s resource IDs, destructive permissions or other workspace-specific restrictions.
- Apply workspace permissions. Resource ID changes apply only to the selected assignment. Empty required permissions stay incomplete. Grant broader resource access only when that workspace needs it.
- Preview shared edit. Review the affected workspaces and material changes before confirming an edit to the shared provider definition. This differs from editing one workspace’s permissions. If the configuration changed while you were reviewing it, reopen it and review the latest version.
- Unassign when finished. Unassign removes that workspace’s API binding and bridge access. The reusable definition and credential grant remain; removing or revoking the credential is a separate action.
Assigning a shared credential and assigning the API definition are separate results. Reattaching a credential creates a fresh assignment with empty resource permissions; review them again. Use separate services for different provider contracts, and reverify after changing the effective configuration or credential.
6. Verify
Run one low-risk provider operation through Outloop and confirm the visible verified state. A read, never a write: an access check is not the place to exercise a mutation.
Pick a parameterless list of the provider’s primary resource — sites, documents, projects — as the proof. Token-introspection reads make poor first proofs: a provider can fail them for a token type that works everywhere else. Workflow ready means every capability the intended outcome needs is present and the provider proof has landed, not only that one read succeeded.
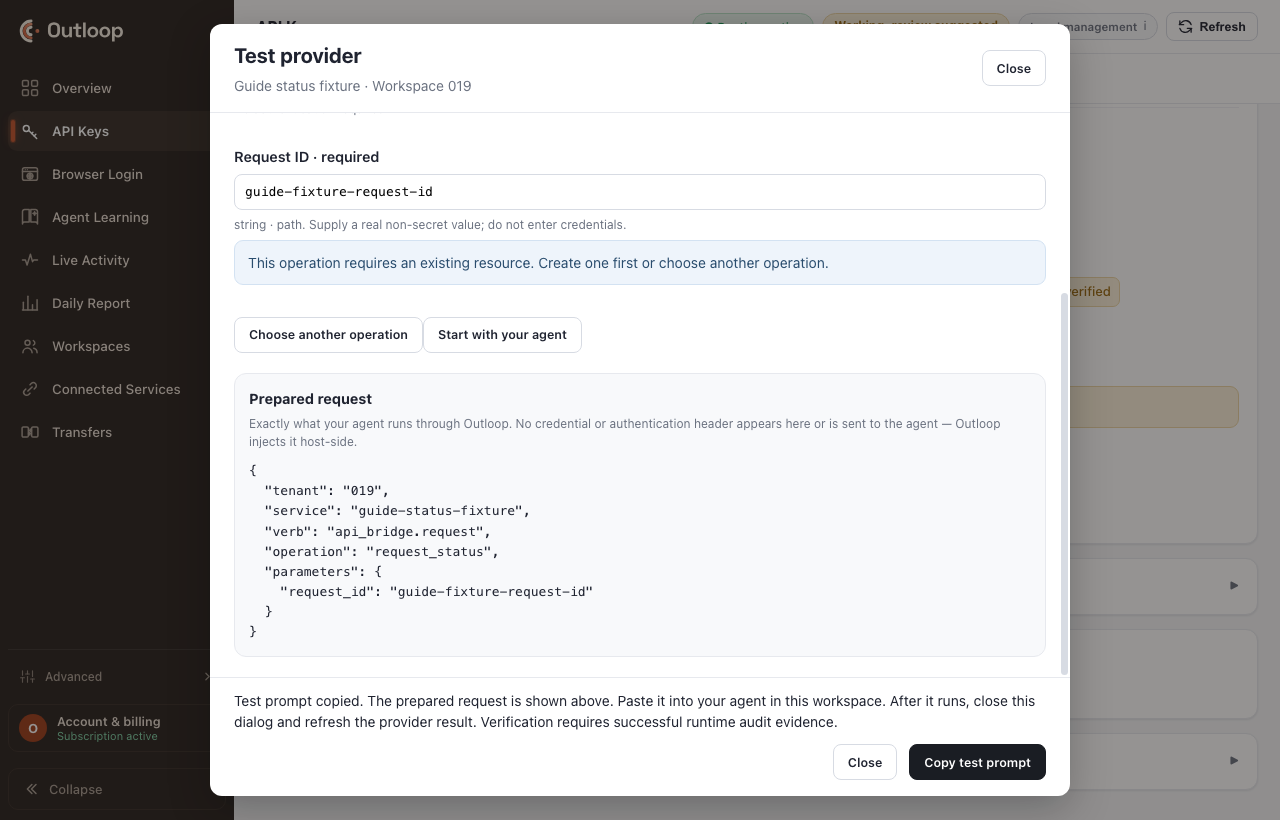
operation:        the lowest-risk real read you declared
decision:         allow
http_status:      200
secret_exposed:   false
runtime_verified: yes

provider_verified is now true for THIS saved configuration
and THIS credential. Editing either one invalidates it.
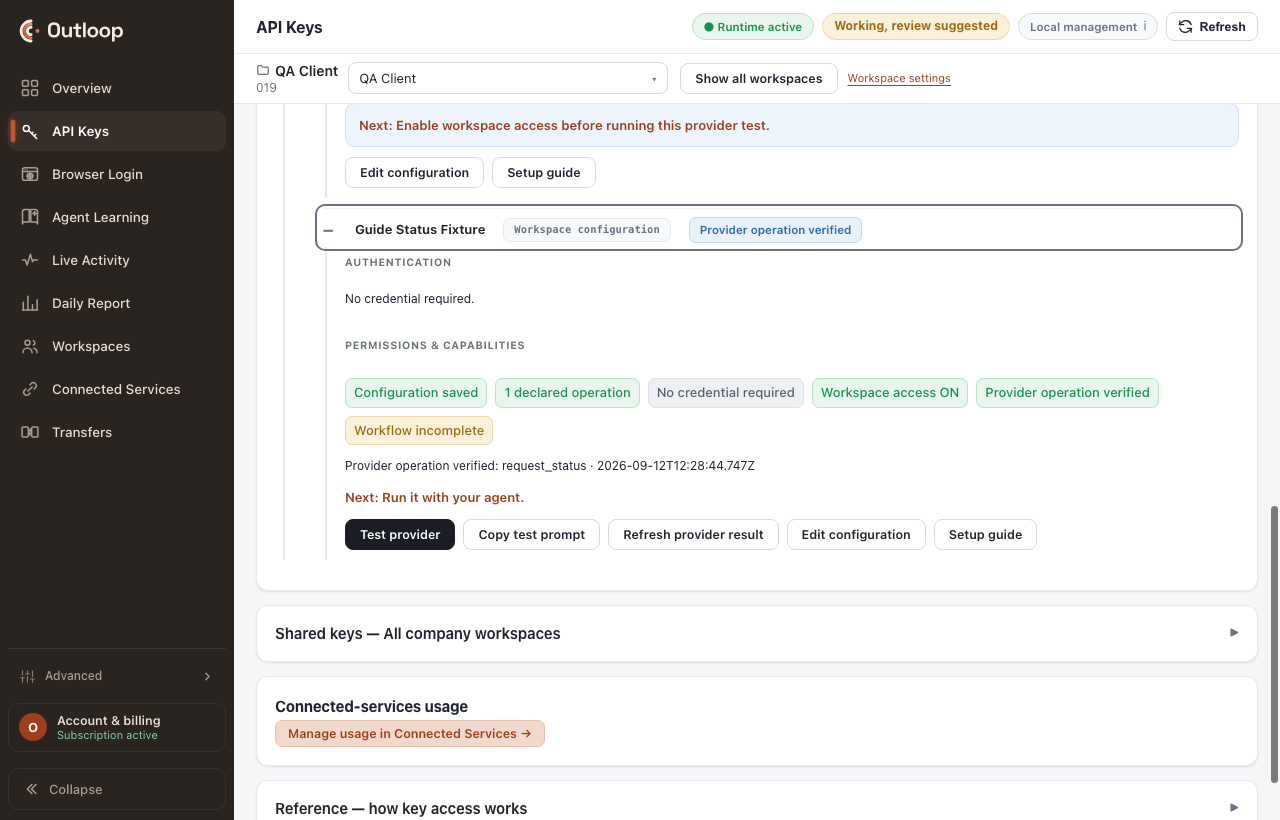
Prove write access without changing anything
A read proves the connection. To prove your agent can also edit, ask it to run an idempotent write: re-save a record with the value it already has, preferably a draft or unpublished one. The provider accepts the write, nothing visible changes, and you know the credential carries write permission. Your agent asks before touching live content, and never publishes as part of a proof.
The required-resource rule
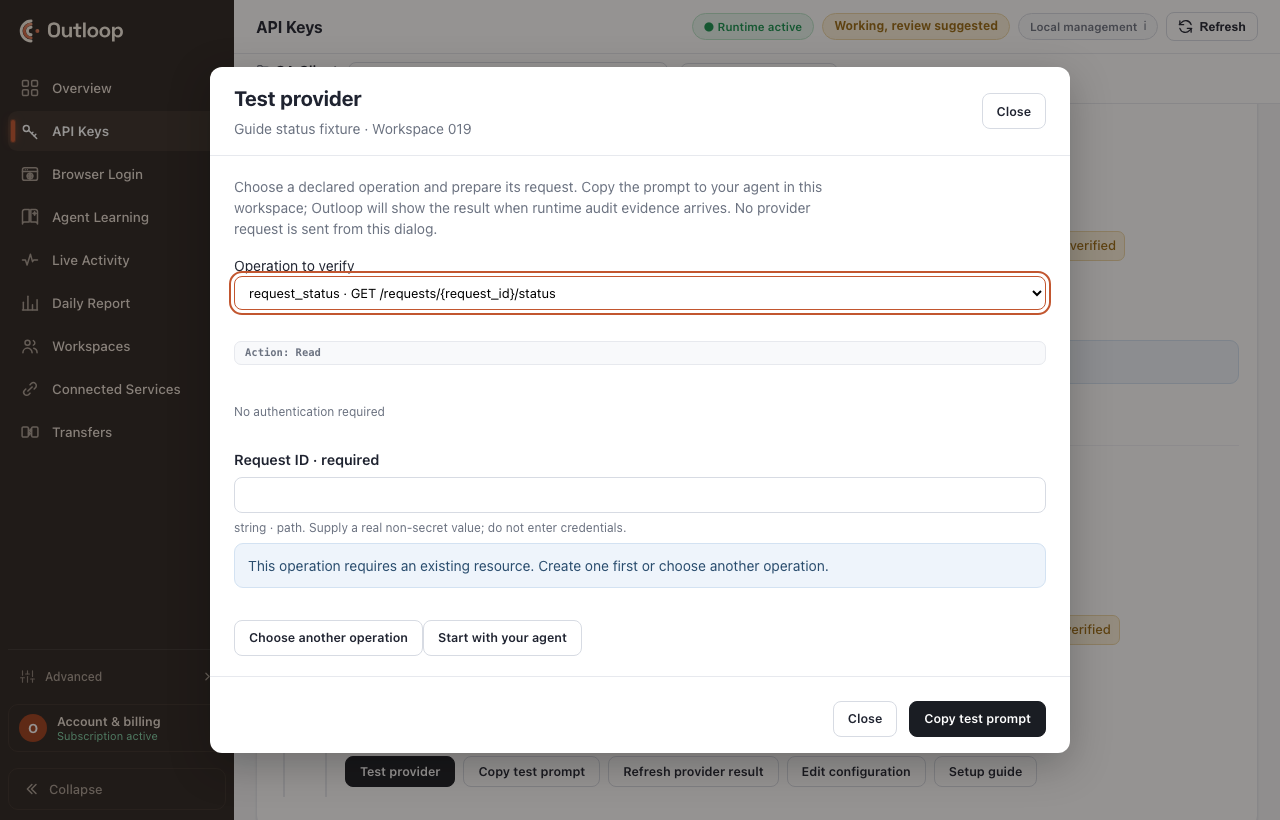
What verified means
0:52 · Open video full size
Read the transcript
Validation checks the corrected definition without calling the provider. The agent saves the configuration and preflights the workspace’s allowed operation. Then a real provider request checks whether the integration actually works. Outloop shows the saved configuration, assigned credential and fresh provider verification. Match that evidence to the intended operation and workspace.
7. Run with your agent
Hand the agent the approved service. It inspects the approved operations and carries provider-generated ids between operations itself — you never paste a job id from one step into the next.
Use the approved {service} Custom API in this workspace. Inspect the approved operations and complete the task through Outloop. Handle provider-generated request/job/resource IDs internally. Do not ask for or expose credentials or authentication headers.
Substitute the real service name for {service}. Nothing in that prompt asks for a
credential, and nothing in it could produce one: Outloop composes the authentication host-side, so the agent uses
the credential's capability without ever seeing it.
What a call and its result look like to the agent
Custom API calls use the operation ID and a parameters object: path and query
values as keys, and the JSON request body under body. On success the provider’s own
response comes back as the result data. Your agent takes operation IDs from the workspace’s live capability list,
never from memory or the provider’s docs — a guessed ID is refused locally.
{
  "service":   "<the service id from the live capability list>",
  "verb":      "api_bridge.request",
  "operation": "update-item",
  "parameters": {
    "collection_id": "<id>",
    "item_id":       "<id>",
    "body": { "fieldData": { "name": "<the value it already has>" } }
  }
} 
Run and test a Custom API
1:50 · Open video full size
Two narration lines are silent in the Custom API test sequence. The screen recording and on-screen captions continue through both gaps.
Read the transcript
The test panel prepares a request for one declared operation. Here I choose the bounded demo inputs and copy the generated prompt. Copying it does not call PandaDoc. The connected Cowork task provides the real read receipt. I check the workspace, request and HTTP 200 result. This receipt is reused from the first-task demonstration. The agent checks that exact document’s state. It has reached document dot draft. I open the file and inspect the Sandbox watermark and blank sample fields. This is the concrete output of the approved operation. This draft downloaded successfully. Other states can behave differently, so check readiness and the permitted download route.
8. Files and results
Real client work produces files, and a file has to land somewhere sane. Outloop covers four shapes:
- →A direct file response. The operation answers with bytes. Set its response mode to file and you get a workspace file receipt — path, size, checksum, MIME — instead of bytes in a conversation.
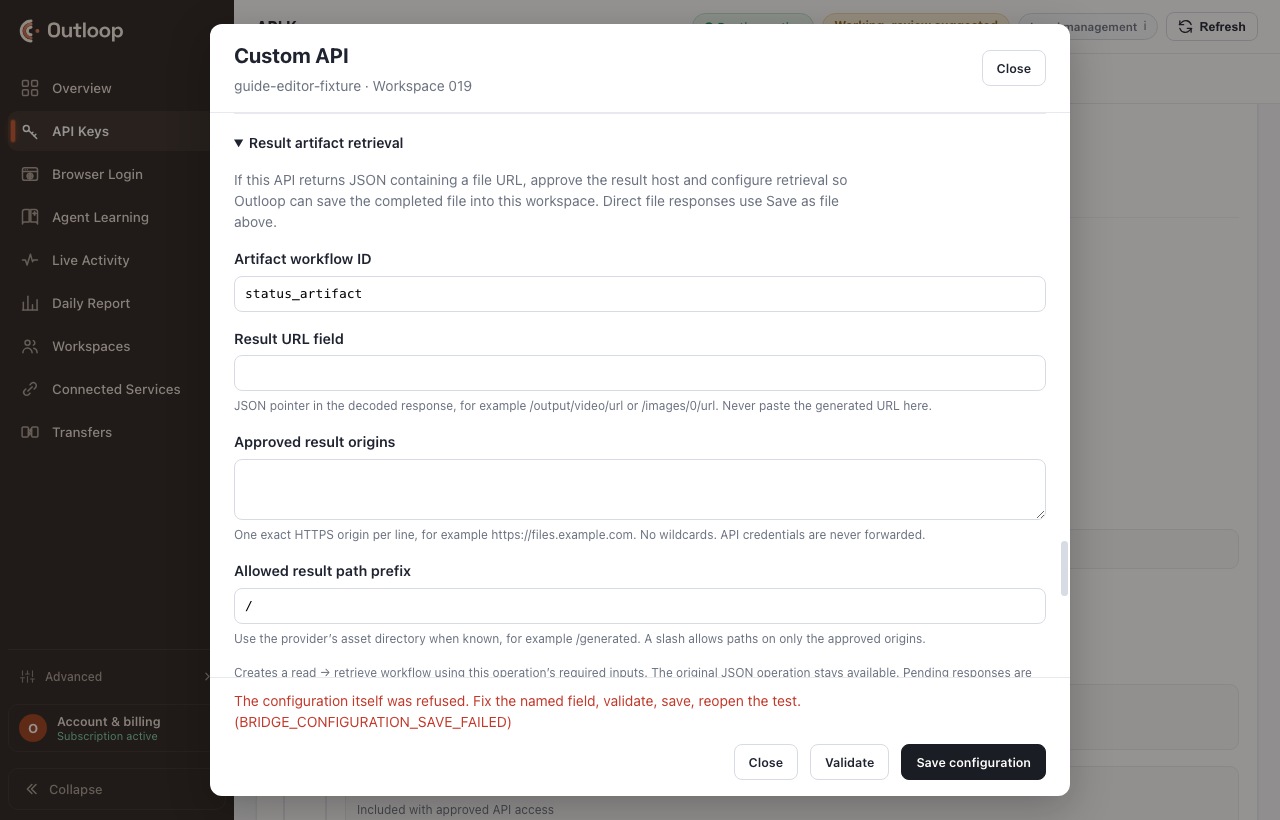
- →A provider-issued result URL. The JSON result points at a finished file on a different host. Result artifact retrieval follows that pointer to an approved result origin and saves the file — without forwarding the API credential to that host.
- →Approved origins and path prefixes. Exact HTTPS origins only, never a wildcard. A result URL outside them is refused locally, with nothing downloaded and nothing forwarded.
- →Uploads. A workspace file as a body source or a multipart part, bounded by declared MIME types and sizes — up to 128 parts, and a 50 GiB ceiling in each direction.
Turn a JSON result URL into a workspace file
Choosing Save as file on a JSON response saves the JSON itself. To retrieve the file it points to, open Result artifact retrieval on the status/result read operation:
- Enter a workflow ID and the JSON pointer containing one result URL, such as
/output/video/url. Use the provider’s documented response shape; never paste a signed asset URL into the configuration. - Approve the exact HTTPS result origins and restrict the path prefix to the provider’s asset directory. The API credential is not forwarded to those hosts.
- Choose Configure artifact retrieval, review the generated file read and workflow, then Save configuration. The original JSON operation remains. This does not run a provider call or switch workspace access on.
- Create once through the approved operation, carry the actual returned ID, and call the artifact workflow.
Open the resulting file only when its receipt reports completed verification and
read_ready.
Handle pending work without creating it twice
The helper starts with three poll attempts; the engine supports 1–100 attempts per declared read step. Review polling and provider-specific pending/error rules in Advanced JSON. An HTTP success can still mean a job is pending. Resume an available protected continuation, or call the approved status/read workflow again with the same ID. Never replay an uncertain create, send or other write to recover a missing result.
Allow changing filenames without allowing arbitrary URLs
Use an exact enum for a fixed list of resources. For generated filenames, open Request body, parameters and headers → Dynamic text parameters and set a bounded string pattern, while keeping the exact origin and directory restrictions. Patterns require start/end anchors and finite lengths; unrestricted wildcards are not supported.
A new pattern does not remove an existing enum: both constraints still apply. Remove an obsolete enum explicitly in the typed parameter schema, review the change, validate and save, then reopen to check the saved rule. The agent must still use the real filename returned by the provider; a matching name does not prove a file exists.
Uploads can use declared file bodies or multipart parts. A declared credential-free transfer can also use PUT to a provider-issued destination. Its exact destination and path still need approval; no API credential, session login or signature is forwarded to that destination.
9. Troubleshooting
The latest attempt selects the rescue card, and every card names the control to fix. The rows below are in match order — the first matching row wins — with HTTP statuses first, then codes, then import and view messages.
Plan- or token-limited endpoints. A verified service can still refuse individual endpoints. If the provider says the feature needs a higher plan or a different kind of token, the configuration is fine: the operation stays declared and starts working once the plan or token changes. Treat it as an external prerequisite, not an error to fix.
| What you see | What happened | Where to look | Next action | Local |
|---|---|---|---|---|
HTTP 401 | The provider rejected the credential. | Authentication → scheme, header name, composition details. | Match the provider docs exactly: scheme, header name, prefix or template. For a two-part key use Multiple credential components. Then re-run the test. | |
HTTP 403 | The provider refused this request; inspect its documented error and permission requirements. | The provider’s account and permission settings; the operation path. | Grant the key the needed permission or plan on the provider side, or pick an operation the key may perform. | |
HTTP 403 with a plan or token-type code on one endpoint (e.g. “not on an Enterprise plan”, “token not authorized for this version”) | The service is verified, but this endpoint needs a higher provider plan or a different kind of token. Nothing is misconfigured. | The provider’s own error code in the result. | Report it as an external prerequisite and keep the operation declared — it starts working once the plan or token changes. Do not change the whole service’s authentication to chase one endpoint. | |
HTTP 404 | The provider found nothing at that path. The request did reach the provider. | Connection → base URL; the operation path; the resource id you entered. | Check the full URL against the docs. If the operation needs a resource id, create one with the approved create operation first — an id from another tool or account is not proof. | |
HTTP 405 | The provider does not accept this method here. Path reached; method refused. | The operation’s method. | Set the method the docs specify, and classify the effect honestly. | |
BRIDGE_CONFLICT | The provider reported a conflict (HTTP 409). The resource already exists, or refuses this change in its current state. | The current provider resource. | Read the resource back before repeating a create or update. Never retry an uncertain mutation. | |
BRIDGE_RATE_LIMITED | The provider is rate-limiting (HTTP 429). Nothing in Outloop needs changing. | The reported retry_after_s, when the provider sends Retry-After. | Wait the reported interval, then re-run. Consider fewer polling attempts in workflows. | |
BRIDGE_PENDING | The provider accepted the request and is still working. provider_accepted is true; verified_completion is not yet. This is normal, not a failure. | The status operation and Result artifact retrieval. | Poll the status operation with the returned id until it is terminal, then retrieve the result. | |
BRIDGE_BUSINESS_ERROR | HTTP 2xx, but the body matched a declared error signal — for example success:false. Transport and auth worked. | The request parameters, and the provider’s error message in the audit. | Fix the input the provider objected to. Keep the error signals declared so a failure never reads as success. | |
BRIDGE_SOAP_FAULT | The SOAP service returned a fault inside HTTP 200. Transport worked. | The operation’s SOAP binding and the session login operation. | Compare the envelope with the WSDL example; re-run the login operation if the session expired. | |
BRIDGE_PROVIDER_ERROR | The provider failed (HTTP 5xx or an unexpected status). Nothing in the configuration is proven wrong yet. | The provider’s status page; the declared success statuses. | Retry later. If the docs say this status is normal for this call, declare it as a success or pending status. | |
BACKEND_SECRET_MISSING | A required credential component is assigned in the configuration but has no stored value for this workspace. | The credential panel for this service. | Enter the value once in Outloop — Add key, this service, Save. The agent never sees it. | Local |
BRIDGE_CREDENTIAL_NOT_ASSIGNED | The authentication block names a reference that has no stored value. | Authentication → credential reference. | Assign the reference, store its value, save. | Local |
BRIDGE_AUTH_REJECTED | Request sent; the provider refused the assigned credential. | Authentication. | See the HTTP 401 guidance: scheme, header name, composition. | |
BRIDGE_OAUTH_… · SESSION · DIGEST · SIGNING | The authentication lifecycle failed before the operation. Token exchange, login, challenge or signing did not complete, so the target operation was never reached. | Authentication → lifecycle fields: token endpoint, login operation, probe operation, signing recipe. | Fix the lifecycle configuration in Advanced JSON, and test the login or probe operation on its own. | |
BRIDGE_NOT_ENABLED | Workspace access is off. The configuration is saved, but this workspace may not call it. | Workspace access. | Turn workspace access on and save. | Local |
BRIDGE_CONFIGURATION_CONFLICT | Another change to this configuration was saved first — workspace access, an assignment, a credential or the provider definition changed while the editor was open. Nothing was saved and no provider request was sent. | The editor message: it names what changed. | Your edits stay in the editor. Review what changed and save again; if the provider definition itself changed, close and reopen the configuration first. | Local |
BRIDGE_RECREATION_… | This configuration needs to be repaired or recreated: the stored bridge record is missing, from an older engine, or held twice. The credential is not the problem. | The service row: Repair configuration or Recreate configuration. | Use the row button first: Outloop restores its last saved configuration or retires the older copy, reuses the assigned credential and keeps the workspace access you approved (off when that cannot be proven). If nothing can be restored, recreate the operations keeping the same operation ids and resource ids, validate, save. | Local |
BRIDGE_OPERATION_REQUIRED | This test needs an explicit choice first — the selected operation is the unreviewed root read, or has a non-read effect that must be acknowledged. | Test provider → operation and effect. | Choose a real low-risk read operation, or acknowledge the effect deliberately. | Local |
BRIDGE_OPERATION_NOT_ALLOWED | The agent or the test named an operation that does not exist, or was renamed. | Operations. | Use one of the declared operation ids, and reopen the test after saving. | Local |
BRIDGE_PARAMETER_INVALID | A parameter did not match its declared shape: missing, wrong type, or outside the approved pattern. | Test provider → parameters; the operation’s parameter schema. | Enter the named parameter as declared, or relax the declaration if the docs allow it. | Local |
BRIDGE_RESOURCE_… | This operation needs an existing provider resource — a request, job or document the provider creates. | Operations → the create operation that produces the id. | Create one first with the approved create operation, or choose another operation for the test. | Local |
DESTRUCTIVE_ACTION_BLOCKED | The operation is classified destructive and the workspace setting is off. | Destructive actions. | Leave it off unless the workflow truly needs deletes. If it does, enable it deliberately and save. Nobody is being asked to approve anything — this is a setting. | Local |
DATA_PRIVACY_ACTION_NOT_ENABLED | The operation is classified privacy_delete, but the required permission is unavailable. | The current Custom API product limitation. | There is no Custom API control to enable this family today. Keep the honest classification and stop; do not relabel it as an ordinary write. | Local |
BRIDGE_FILE_RESPONSE_NOT_ENABLED | The agent asked for a file but the operation’s response mode is inline. | The operation’s response handling. | Set the response mode to auto or file, save, then request the file again. | Local |
BRIDGE_TRANSFER_URL_… | The provider returned a download or upload URL on a host or path prefix that is not approved, or one Outloop cannot use safely. No credential was forwarded; nothing was downloaded or uploaded. | Result artifact retrieval or Provider-issued file upload → approved origins and path prefix. | Add the exact HTTPS origin the provider uses — no wildcards — and the path prefix; save. | Local |
Destination / host / redirect / DNS refusals | A private or unapproved host, a redirect off-origin, or a DNS failure. The request did not leave the approved boundary. | Connection → base URL; result origins. | Use the documented public HTTPS host. Approve private destinations explicitly if the provider is internal. | Local |
Media / file / body / multipart refusals | The file, body or upload did not meet the declared limits: wrong workspace path, disallowed MIME type, size over the limit, or a body format mismatch. | The operation’s body sources, multipart parts and limits. | Point at a file inside the workspace, match the declared type and size, or raise the limit deliberately. | Local |
BRIDGE_RESPONSE_… · XML · STREAM | The provider answered, but the response did not match the declared format — HTML or XML where JSON was declared, an oversized body, or a selector pointing at nothing. | The operation’s response format, data pointer and selectors. | Declare the real response format and pointers, taken from a documented example. | |
Configuration refusals (contract, header, path, pagination, workflow, stage, engine) | The definition itself was refused: invalid, unsupported by this engine version, or changed while a test was open. | Validate in the editor — the message names the field. | Fix the named field, validate, save, reopen the test. | Local |
SERVICE_NOT_GRANTED · TARGET_HOST_NOT_ALLOWED · METHOD_NOT_ALLOWED · CAPABILITY_NOT_ENABLED | This workspace may not use that service or method. The grant was removed, the workspace archived, or the method or host is outside the approved set. | The service row for this workspace. | Re-grant the service to the workspace, or approve the method or host in the configuration. | Local |
BRIDGE_TRANSPORT · DEADLINE · CANCELLED · BUSY · EXECUTION | The request could not be completed — network failure, timeout, cancellation, or an internal execution error. The outcome is uncertain if the operation was a mutation. | Provider reachability; the audit entry. | For a read, retry. For a mutation, read the resource back before repeating. | |
Import: “Map the required security scheme to an existing compatible authentication binding” | The specification asks for a sign-in method you have not set up — often OAuth — so Apply is refused. | Import API specification → the scheme mapping list. | If the provider documents that your token works as a Bearer token, let your agent import a sanitized copy (see When the official specification won’t apply). Otherwise configure OAuth in the editor. | Local |
Import: many operations “need a manual parameter definition” | The importer cannot express some schema shapes, such as oneOf, allOf, anyOf, minProperties or an unanchored pattern. | The import review list and its unsupported rows. | Your agent can define those operations manually or import a simplified copy. If core create or update rows are affected, prefer the simplified copy — a read-only half workflow is not ready. | Local |
Import: “This parameter type cannot be serialized faithfully” · “parameter name or location needs manual configuration” | Object-style query filters — date ranges, for example — are not supported yet, in either the object form or the flattened name[key] form. | The operation’s query parameters. | The operation works without them. Your agent leaves the optional filter out and tells you which filters it dropped. | Local |
Test provider lists old operations, or says workspace access is off after you enabled it | The dialog is still showing the definition from before your last Save. | The API Keys view. | Reload the API Keys view, then open Test provider from the service row. | Local |
The row still says “1 declared operation” after a large import | The row’s chips refresh on reload. | The API Keys view. | Reload the API Keys view. | Local |
An agent’s memory note is refused as RECEIPT_SECRET_SHAPED | Long provider ids can look like keys to the safety filter. The setup is unaffected; the note just is not stored. | The agent’s report. | Nothing to fix in the configuration. Describe ids in words rather than pasting them into a note. | Local |
Fix a validation error
0:31 · Open video full size
Read the transcript
Here I remove the HTTPS prefix in an unsaved diagnostic draft. Validation tells me exactly what is wrong. I restore the official HTTPS origin and validate again. The definition is valid now, but that is not a provider test. I close the unsaved draft, leaving the verified service intact.
Advanced
Reference for complex APIs
Everything above is enough for most providers. The material from here on is for the ones that need more: specifications that will not import as published, the engine’s full capability model, and worked examples.
When the official specification won’t apply
Some providers publish specifications that Outloop can read but not apply as-is. Two cases are common. First, the
specification requires an authentication scheme — often OAuth — while you connect with a site or API token that
the provider accepts as a Bearer token. Second, key operations use schema features such as
oneOf or object-style query filters that the importer marks unsupported. In both cases
your agent can derive a reduced copy of the official specification: same paths, methods and operation IDs, the
security scheme you really use, and generic JSON request bodies. It imports that copy with
Paste JSON or YAML, tells you exactly what was simplified, and keeps the file in your workspace
for future re-imports. The official specification stays the source; nothing is invented.
The order to try: import the official specification by URL first and read what the importer reports. If a required scheme has no compatible binding and the provider’s own documentation confirms your token works as a Bearer token, sanitize. If only a few rows are unsupported, define those operations manually instead. If core create or update rows are unsupported, sanitize.
| Part of the specification | What the reduced copy does |
|---|---|
| Keep | Every path, method, operation ID, summary and tag, and the official server entry — so a version prefix such as /v2 stays in the server and imported paths keep their shape. |
| Authentication | Replace per-operation security with the scheme the provider really accepts for your token, and drop the scheme you cannot use. |
| Parameters | Keep name, location, required, scalar type, enum and format. Strip pattern, min/max constraints, examples and vendor extensions; collapse oneOf/anyOf/allOf to the one shared type. |
| Object query filters | Drop optional object-style filters (date ranges, for example) — the importer accepts neither the object nor the flattened name[key] form — and list every dropped filter in the report. |
| Request bodies | Keep the content types and replace the schema with a generic JSON object that points at the provider’s documentation. The agent passes the documented JSON as the body. |
| Responses and size | Reduce responses to a generic JSON object, and strip descriptions so the paste stays small. |
After importing, the review still matters: classify each operation’s effect honestly, leave out what the outcome does not need, and expect the agent to tell you which filters or schema details were dropped and where the derived file lives. A reduced specification is a faster source, not a verified workflow.
See the Webflow example for one run of this recipe.
What the engine supports
Current limit: the engine recognizes privacy deletion, but Custom APIs do not yet have
a control to enable that permission. A privacy_delete operation remains refused. Do not
classify it as an ordinary write to bypass the refusal.
Every number below is a property of the shipped Custom API bridge contract, read out of the product rather than written from memory. They describe what the engine accepts — they are not a claim that any particular provider has been connected or verified.
| Dimension | What the engine supports |
|---|---|
| HTTP methods | 7 — GET, POST, PUT, PATCH, DELETE, HEAD, OPTIONS. CONNECT and TRACE are always denied. A POST can be a read (SOAP, search); the method never classifies the operation. |
| Effects | 9 — read, compute, write, external_send, financial, access_change, consent_change, destructive, privacy_delete. Every operation declares one honestly. |
| Authentication kinds | 12 — from no authentication through bearer, composed API keys, Basic, OAuth, digest, HMAC signing, mTLS and session login. |
| Body and response formats | 7 — json, text, form, binary, multipart, xml, soap — plus auto. |
| OpenAPI import | 3.0, 3.1 and 3.2. Swagger 2.0 must be converted first. |
| Envelope limit | 8 MiB request and response. |
| Header limit | 64 KiB. |
| Multipart parts | 128. |
| Workflow steps | 16, with 1–100 poll attempts per read step. |
| Upload / download ceilings | 50 GiB each. |
| SOAP | 1.1 only. |
Two consequences worth stating plainly. The method never classifies the operation — a POST can be a read, which is normal for SOAP and for search endpoints, so every operation declares its effect honestly instead. And SOAP 1.1 is supported and shipped, including the session pattern, so "we only do REST" was never true of this engine.
Reusable patterns
These are shapes, not provider code. Outloop ships no provider-specific Custom API adapters of any kind.
| Pattern | What it covers |
|---|---|
| REST API with an API key | Header or query key; JSON read and write operations. |
| Bearer token or OAuth | Static bearer, refresh-token exchange, or client credentials. |
| Multiple credential components | “Key <id>:<secret>” style values composed host-side from separate references. |
| Async create → poll → result | Submit, carry the id, poll status, retrieve the terminal result. |
| Provider-generated IDs | IDs flow from the create operation into later operations. The agent carries them; nobody pastes them. |
| Uploads | A workspace file as a body source or multipart part, with MIME and size limits — or a provider-issued (presigned) upload: a create operation returns a one-time URL, Outloop uploads to an exact approved origin with the signed headers from that response, keeps the URL hidden and returns only the declared asset fields. |
| Downloads | Binary responses published as workspace files, with collision rules. |
| Provider-issued result URLs | Approved result origins and a path prefix. No API credential is forwarded to the result host. |
| SOAP and session APIs | Login operation, captured session value, reuse rule, fault signals. |
| Complex APIs | Signing, digest, mTLS, pagination and workflows edited in Advanced JSON. |
Worked examples
A document API with a prefixed API key
The documentation shows the authorization value as API-Key <your key>. Sending the key bare can cause an authentication failure. Check the documented composition as well as credential
validity. Set the value template to the scheme word, a space, then
the single credential placeholder. Not the bare value, and not Bearer.
The rest of the recipe: import the published OpenAPI specification by URL and expect a large catalogue, of which most operations are irrelevant to your outcome; select what the outcome needs and classify each effect honestly, because a document create is a write, not a read. Creating a document is asynchronous — the provider returns an id in a non-terminal state — so the honest workflow is create, carry the id, poll to a terminal state, retrieve. The retrieval is a binary response, so set that operation to save as a workspace file.
An async media API whose result lives on another host
Four operations in sequence: a create that submits the generation and answers with a request identifier; a status read that takes that identifier and reports progress; a result read whose terminal payload carries a URL to the finished media on a host that is not the API host; and the retrieval that follows it to an approved result origin and saves a workspace file. Configure result artifact retrieval with a JSON pointer to the media URL, the exact HTTPS result origin, and the path prefix. Exact origins only — no wildcards.
- ✕Status-only is a half workflow. Configuring the status read first feels like progress — it is a GET and it is safe — but a configuration that can check a request and cannot create one can never be exercised, because the identifier it needs has no producing operation. Readiness says so. Believe it.
- ✕An account with no credits is an external prerequisite, not a configuration bug. A create that is accepted and never completes may simply be an empty balance. Name it and stop — never loosen the configuration to make it look like something else.
A site API whose official specification needs sanitizing
A site and CMS API connected with a site-level token. It shows the sanitization recipe, the reload-before-test step and plan- and token-limited endpoints. The business side of the same work is on the Webflow use case.
- What you get. Reads of sites, pages, CMS collections and items, assets, forms, components and webhooks; creating, updating and publishing CMS items; editing page settings and content; optional deletes.
- Before you start. A Webflow site token with the scopes the work needs — for example sites, pages, CMS, assets and forms. A site administrator creates it in the site’s settings under Apps & integrations → API access → Generate API token, choosing its scopes there. You create it and paste it into Outloop; the agent never sees it.
- Connection. Base URL
https://api.webflow.com, Bearer token authentication, and the specification’shttps://api.webflow.com/v2server selected in the import. - Import. In the tested Webflow import, the official specification exposed authentication definitions that Outloop could not map directly to the Site Token configuration, so the agent imported a sanitized copy that preserved the official paths, methods and operation IDs while mapping authentication to the Bearer token actually being used. Of 126 operations discovered, 123 were approved; the store order fulfil and refund operations were deliberately left out.
- Verify. Reload the API Keys view, then prove with the parameterless list-sites read. For edit access, an idempotent write on a draft CMS item — re-saving its current name, staged and not published — proved write permission without changing anything.
- Known limits. 301 redirects through the API require an Enterprise workspace. Site tokens do not grant access to Webflow’s custom code endpoints, such as registered scripts; those need an OAuth app token, which is a token-type limit, not a configuration fault. Date-range filters on item lists were not available through the import.
- After setup. Finish definition changes before your final provider proof. If Outloop shows verification is no longer current after a change, run another low-risk proof. Enabling destructive operations did not clear the verification in this run.
Webflow facts checked against Webflow’s site token documentation and the 301 redirects reference on 25 September 2026. Re-read them before relying on these limits.
What is proven, and what is not claimed
The recording and the engine reference support different claims. Neither verifies your own account or configuration.
- Recorded PandaDoc Sandbox proof, 13 September 2026. The approved Cowork demo on Outloop 1.36.0
installed and activated the setup Skills, configured the practice integration, completed a bounded read, created
one synthetic draft, checked its status and retrieved a PDF. The matching Outloop receipts report
secret_exposed: false. No send, signature or deletion was exercised. - Webflow Custom API setup, September 2026. One real repair took a Webflow Custom API from a single broken operation to 123 approved operations, verified by a list-sites read over Outloop, with further reads and two no-op writes succeeding. The site, its ids and the workspace are not published. It proves that run, not every Webflow plan or token type.
- Engine and product documentation. The authentication kinds, formats, limits, reusable definitions, dynamic filename rules and indirect artifact retrieval describe the product contract. The PandaDoc recording does not demonstrate all of them.
- Synthetic screenshots. The still images illustrate dashboard states using fixture data; a success state in a fixture is not a live provider receipt.
- Runtime coverage. The recorded setup proves the demonstrated Cowork path. Consult the Skill library for current package compatibility; installation instructions for another runtime are not proof of a run there.
- Your verification remains separate. Run a safe read with your approved configuration and credential, then prove the requested workflow with its own results. Reverify after configuration or credential changes.
Rotate or revoke safely
Verification is tied to the exact saved configuration and the exact credential. Editing either invalidates it — which is the point. A rotated key is a different credential, and a configuration that worked with the old one has not been shown to work with the new one.
- 1.Create the replacement credential on the provider first, where the provider allows both to exist at once. Then you never have a window with no working credential.
- 2.Enter the new value in Outloop, in the same credential panel. The reference name does not change, so no operation has to be edited.
- 3.Re-run the verification read and confirm the visible verified state comes back. Until it does, treat the service as unverified rather than assuming.
- 4.Revoke the old credential on the provider. Revoking there is what actually ends its reach — deleting a reference in Outloop stops Outloop using it, not anyone else.
To take access away without touching the credential at all, turn workspace access off. The configuration stays, every call refuses locally, and nothing reaches the provider.
Glossary
| Term | What it means in Outloop |
|---|---|
| Operation | One approved request shape: method, path, effect, parameters, response handling. |
| Effect | Honest classification of what an operation does: read, compute, write, external_send, financial, access_change, consent_change, destructive, privacy_delete. |
| Credential reference | A name inside the configuration that stands for a value stored once in Outloop and never shown. |
| Workspace access | The switch that lets this workspace call the saved configuration. |
| Provider verified | Outloop ran one operation against the provider and the provider completed it. Proof is tied to the exact saved configuration and credential; editing either invalidates it. |
| Workflow | A saved sequence of operations with bindings and polling, run as one request. |
| Result artifact retrieval | Reading a JSON result, following its file URL to an approved origin and saving the file into the workspace, without forwarding the API credential. |
| Provider-issued file upload | Running a create operation that returns a one-time upload URL, then uploading a workspace file to it on this Mac. The URL never reaches the agent, only exact approved origins are accepted, and the API credential is never sent to the upload host. |
| Sanitized specification | A reduced copy of a provider’s official OpenAPI specification, imported by paste when the original cannot be applied: the same paths, methods and operation IDs, the authentication you really use, and generic JSON request bodies. The official specification stays the source; nothing is invented. |
| Idempotent write proof | Proving write permission without changing anything: re-saving a record — preferably a draft or unpublished one — with the value it already has. |
Official documentation
A Custom API is configured entirely from the provider's own published API documentation — that is the authoritative source for the base URL, the authorization scheme, the paths, the parameters and the terminal states. Outloop has no provider-specific knowledge to add, and neither this guide nor the Setup Skill substitutes for reading it.
- →The OpenAPI Specification — the import formats Outloop accepts are 3.0, 3.1 and 3.2. Swagger 2.0 has to be converted first.
- →The Outloop Custom API Setup Skill in the Skill library — the download, its checksum and the full package documentation.
- →The connector guides — check here before building a Custom API. A native connector, where one exists, is always the better route.
- →AI agent API key management — the reasoning behind the boundary this page configures.
Outloop is available with setup guides and product support for agency teams. Outloop is an independent tool and is not affiliated with or endorsed by any provider named on this page. Provider names are used only to illustrate reusable configuration patterns, and are trademarks of their respective owners.
Is this for you?
A good fit if…
- A client system has no ready-made Outloop setup guide.
- The provider has a documented HTTPS API with key or OAuth authentication.
- You want the agent to do the integration research while the credential stays out of the prompt.
You may not need Outloop if…
- A setup guide already covers the provider — follow that guide instead.
- The system has no API and the job only works in a website — use Outloop’s managed browser with Browser Login instead.
- You need a hosted integration platform rather than software on your Mac.
Name the service. Let the agent do the setup.
Connect approved access once, in the workspace it belongs to, and let agents work across client systems without ever seeing the credential.
Start 14-day trial